Hi everyone,
Just a quick reminder for those of us in North America...Daylight Savings Time is happening at 2.a.m. on Sunday morning - November 4th...so don't forget to set your clocks back an hour tonight (Saturday) before you go to bed...that is unless you want to wake up at 2 a.m. and set your clock back then. I do not. I'd much prefer to sleep :) :) That's the news from the ocean shores of California today. Love and hugs, Heather :)

Saturday, November 3, 2012
Sunday, September 30, 2012
HAPPY SONDAY, EVERYONE !!!!!!!
Hi everyone,
I want to wish you all a very happy SONday. Here is a nice Scripture photo for you to enjoy. Feel free to share this on your blogs or on Facebook. Just please, link this photo back to me. Thanks :)
.jpg)
Have a great day, everyone. I start my new job tomorrow and I'm nervous and excited all at the same time. That is the news from the ocean shores of California today. Love and hugs, Heather
Saturday, September 29, 2012
I GOT A JOB. I GOT A JOB.

This is a vintage truck that I saw in the parking lot of the local mall. It's so cool. Nothing compares to vintage vehicles. They have so much style and character.
Hi everyone,
How are you all doing? It has been a LONG, LONG, LONG, LONG time since I last posted something here.
Well, let's see. I got a job. It's a part-time job here at a well-known department store. I'm so excited. There is the possibility of picking up extra shifts when available, which is really nice. It also means that I am one step closer to being completely off of public assistance. It's scary and exhilirating all at the same time. I've been grateful for the help, because without it my family would have really suffered. However, it'll be nice to slowly be back to a place where I can "be my own boss" in terms of my money etc :) :) :)
I also became a Mary Kay Independent Beauty Consultant and I'm really excited about that, too. So if you have any questions about that, please send me a private email :) :) I can ship anywhere in the United States.
What else? I"m pursuing my photography a little bit more. That's really neat. I'm looking into seeing what I can do to earn some extra $$$ from all of that.
I am also going to get braces. I'm paying for that out of my own pocket since I don't have health insurance. However, God is making it possible for me to do this. My dentist and my orthodontist are aware of my situation and have been really bending over backwards to work with me. Did I mention how thankful I am that God is making this all possible?
Oh, and I'm taking my "behind the wheel" driver test on Friday, October 5th at 2:30 p.m Pacific Standard Time. Please pray for me that I"ll pass. It has been a really difficult couple of months in my personal life. I'd written about it twice and then deleted the posts, because I didn't want a reason to dwell on those bad things. However, God has been really, really good to me...and so many things are happening all at once :) :)
With that, I leave you all with this photo. This is me, how I look now after having lost 87 pounds. I rarely post photos of myself, but I like this one:

That really is the news from the ocean shores of California today. Extra love and hugs, Heather :)
Wednesday, August 15, 2012
TEXTURE TUESDAY
Hi everyone,
How are you all doing today? I'm doing really well. I'm still dealing with some congestion etc that I've had since the Tuesday before last. It started out as a really bad, hoarse, scratchy throat and now I'm just congested. It's getting better, but it still sounds icky gross when I cough sometimes.
However, having said all of that, it's a fantastic day. My dad and I were running some errands today and decided to take the ocean drive back home. We almost always drive through Pacific Grove...and lo and behold there is a "Little Car Show" going on. So I had to stop and take some photos. I'll share some more of that another time.
Today I'm participating in Texture Tuesday over at the lovley Kim Klassen's blog. Click here to pay her a visit. She's a really nice lady with some of the neatest textures anywhere. I use them with Photoshop and Picmonkey.
This week it's centered around "looking down". Whenever I am at the ocean (which is any chance I can get) I like to go to the rocky shore and look down at the ocean. It gives me time to rest, breathe, think and be grateful for all the good things that are happening in my life. It makes me happy.
Here is the original photo that my father took of me this morning. It was a rather ocean foggy day this morning. The fog hadn't lifted yet, so it was still very gray:
.JPG)
Then this is what I did with the photo. I used three different, but equally lovely textures from Kim Klassen. Here is the photo and then I'll tell you what I did with it:
.jpg)
I started out with the "Dream It" texture for this week...and I followed a similar recipe to what Kim Klassen used for her photo.
I added the "Dream It" texture in soft light at 80% opacity and gaussian blur at 100%. Now the gaussion blur, I'm not sure what "percentage" I should have used. I consider it a success that I even found that feature on my Photoshop CS3 :) :)
Next I added "waterstained frame" at 80% opacity. Oh, I think this was in "screen", but I can't remember for sure...
Then I switched to Picmonkey...hush...don't tell anyone...and I added a third layer of "Reverie" in Overlay at 76% fade...
So that's what I did to get this look. I love the much softer look. It still reflects the gray tones on a foggy ocean day. You really can't see much of anything. In spite of all that, it's absolutely gorgeous and I love the icy blue/black of the water when I look down at it.
Thanks for stopping by to visit me today. I love it when you all leave me comments.
That is the news from the ocean shores of California today. Love and hugs to your day, Heather :) :) :)
Wednesday, July 25, 2012
I'M STILL HERE
Hi everyone,
I'm still here :) :) :) I'm sorry I haven't posted in awhile. A lot is happening here. It's all good things, but I went from having nothing to do everyday....literally, to suddenly having something planned every day of the week...and it's been a bit of a shock, a happy shock....but wow, I really need to manage my time better.
Also, someone that knows me (but has chosen to remain anonymous) has generously paid for me to get some much-needed dental work done...It's been well over 10 years since I've been to a dentist...probably around 17....I'm ashamed to admit that...but I've not been able to afford to go.
Needless to say, I have some cavities and tooth decay happening behind my beautiful smile. However, that is now getting fixed and correct...and can I say WOW...how amazed and humbled I am about that? I'm so thankful :) :)
.JPG)
I had visit number TWO of four at the dentist office this week? WHAT???? Remember, what I said earlier about needing some serious dental work? Well, it's all good and my dentist is FABULOUS. So after that, I went to see my chiropractor in Pacific Grove. Since his office is three blocks from the ocean, I decided to take in the view today. Let me tell you that it is some kind of fabulous today. It's really warm and the water is the most beautiful shade of blue I have ever seen. Enjoy this.
Pray for me as I work to be more disciplined with my blogging. I really do love and appreciate all of you. Your visits and comments really make me smile BIG :) :)
That is the news from the ocean shores of California today. Love and hugs, Heather :)
I'm still here :) :) :) I'm sorry I haven't posted in awhile. A lot is happening here. It's all good things, but I went from having nothing to do everyday....literally, to suddenly having something planned every day of the week...and it's been a bit of a shock, a happy shock....but wow, I really need to manage my time better.
Also, someone that knows me (but has chosen to remain anonymous) has generously paid for me to get some much-needed dental work done...It's been well over 10 years since I've been to a dentist...probably around 17....I'm ashamed to admit that...but I've not been able to afford to go.
Needless to say, I have some cavities and tooth decay happening behind my beautiful smile. However, that is now getting fixed and correct...and can I say WOW...how amazed and humbled I am about that? I'm so thankful :) :)
With that, I'll leave you with this photo of the day:
.JPG)
I had visit number TWO of four at the dentist office this week? WHAT???? Remember, what I said earlier about needing some serious dental work? Well, it's all good and my dentist is FABULOUS. So after that, I went to see my chiropractor in Pacific Grove. Since his office is three blocks from the ocean, I decided to take in the view today. Let me tell you that it is some kind of fabulous today. It's really warm and the water is the most beautiful shade of blue I have ever seen. Enjoy this.
Pray for me as I work to be more disciplined with my blogging. I really do love and appreciate all of you. Your visits and comments really make me smile BIG :) :)
That is the news from the ocean shores of California today. Love and hugs, Heather :)
Sunday, July 15, 2012
INDEPENDENCE DAY PHOTO CONTEST
Hi everyone,
I am entering this super fun, super cool photo contest over at the "Have an Epiphanie" blog. If you love really cool photo stuff and the coolest, most stylish photography bags EV-AH...then click here and pay these nice folks a visit.
We were asked to post one photo that speaks to us of our Independence Day. This is my favorite photo out of all the pics that I took on July 4th. In fact, I shared this photo in a previous post. This photo was actually taken on July 2nd, as the city was getting ready for the 4th of July parade.
This is a photo of Colton Hall in Monterey, California. Monterey has a HUGE historical significance in the Spanish and Mexican periods...and also in the American period. We are getting ready to celebrate another year of independence...and I don't know about you, but it feels really good ;) :)
Colton Hall is where the very first constitution for the State of California was signed. It also served as a school in the early 20th century. That bit of information I learned from my 80-something year old neighbor, whose mother went to school there.
Here's my entry for Independence in July :) :) Enjoy:
.jpg)
That's the news from the ocean shores of California today. Extra love and hugs to your day, Heather
Tuesday, July 3, 2012
HEATHER'S TEXTURE TUESDAY
Hi everyone,
It's been a really exciting week for me. I'm not ready to talk about what it is...yet. However, it is pretty big for me :) :)
I'm participating in Kim Klassen's Texture Tuesday this week. Today it's an "anything goes" edition. So I decided to show you all my very FIRST texture that I used. It was Kim Klassen's "Autumn Burst" back in September 2011. I hadn't learned how to resize the layer image yet, so I just cropped everything instead. This photo was of a lilac bush in my neighbor's yard. Lilacs are so beautiful and delicate:

Tomorrow, our country will be celebrating it's birthday on July 4th :) :) There will be a parade downtown and I'm looking forward to checking that out.
In the meantime, I leave you with a photo of Colton Hall in the city of Monterey, California. Colton Hall is where the first constitution for the State of California was signed back in the 1850s. It also served as a school at the turn of the 20th century. It's being decorated for our July 4th celebrations tomorrow:
.JPG)
That is the news from the ocean shores of California today. Extra love and hugs to your day today, Heather :)
Tuesday, June 26, 2012
HEATHER'S PHOTO TEXTURE TUESDAY
Hi everyone,
I'm participating in Kim Klassen's Texture Tuesday link-up again today. If you'd like to visit her blog, click her. She takes beautiful photos and has some of the most amazing photo textures, too.
Here is the original photo that I took last Sunday:

There is a really sweet story to this photo. An older couple in our church got married at the beginning of June. They are both in their 80s. They were both married to their respective spouses for well over 50 years. They both became widows. They met at a weekly dinner/Bible study at my church. They eventually found love again in each other. It was really sweet to see. We surprised them with a post-wedding reception after church. The wife was totally surprised. The husband knew about it all along. He can keep a good secret.
It was such a sweet, precious time. Everyone was clapping and cheering for this couple. I think the best love stories are the ones that are written by God - the Author of Ultimate Love.
Okay, so what did I do with that flower photo? See below:

Voila, here it is. I used TWO of Kim Klassen's beautiful photo textures. I used Photoshop to edit and texturize my photograph today. First I used two layers of "Reverie" texture. The first layer in soft light at 60% opacity. The second layer in hard light at 30% opacity.
Then I added a THIRD layer of "waterstained frame" at "I totally forget" opacity...just dark enough to see the waterstained frame around the edges of the photograph.
All the textures were free downloads from Kim Klassen's website. Thank you, Kim :) :) :)
That is the news from the ocean shores of California today. Extra special love and hugs to your day today, Heather
Friday, June 22, 2012
HEATHER'S "MAGICAL BLUE SOCKS" WITH TUTORIAL - PART 5
Hi everyone,
So this will be the last and final post in my series on the "magical blue socks" tutorial. Socks are really easy to knit and once you know the basics, you can customize the socks to fit any size foot.
If you want to catch up on all of the previous posts in this series, please click on the links below:
Heather's Magical Blue Socks with Tutorial - Part 4
Heather's Magical Blue Socks with Tutorial - Part 3
Heather's "Magical" Blue Socks with Tutorial - Part 2
Heather's "Magical" Blue Socks with Tutorial
Now the last thing to do is shape the toe and close it off.
At this point, I put all the instep stitches from needle three onto needle 2. So I work with only 3 double-pointed knitting needles when I'm shaping the toe.
SHAPING THE TOE:
Round 1:
Needle 1 - Knit to last 3 stitiches, knit 2 together, knit 1
Needle 2 - Knit 1, ssk (slip, slip, knit), knit to last 3 stitches, knit 2 together, knit 1
Needle 3 - Knit 1, ssk (slip, slip, knit), knit to end.
Round 2: Knit even all the way around
Just repeat these two rounds till the toe measures 1 1/2" long. In my case, that was a total of:
22 rounds

All that is left to do is close the toe, so you can actually wear your socks.
There are different methods of doing this, but my all-time FAVORITE is the "kitchener stitch". It keeps that knit stitch going and has the smoothest finish I've seen so far.
This is how to do it:
Knit stitches from Needle 1 onto Needle 3.
Hold double-pointed knitting needles with purl sides together.
With your yarn needle, draw the yarn through first stitch on the front needle as a purl and leave ON, draw yarn through first stitch on back needle as a knit, and leave ON:
Now here's the rest:
Step 1 - Draw yarn through first stitch on front needle as a knit, slip OFF. Draw yarn through second stitch on front needle as a purl, leave ON.
Step 2 - Draw yarn through first stitch on back needles as purl, slip OFF. Draw yarn through second stitch on back needle as knit, leave ON
All you do is repeat steps 1 and 2 across. Then tie knot at the end and weave in the yarn end. It's that simple ;) :)
Some people like to block their projects, I do not...especially when it comes to socks. I'm putting the socks on right away..and if they're knit to the correct measurements they WILL fit.
If you have any questions about the instructions or need some help, please let me know. I'll do my best to help answer your questions :) :)
With that, I'll leave you today with this nice photo:
.JPG)
This was a rose that was part of my dad's Father's Day bouquet. I think it's really pretty.
That's the news from the ocean shores of California today. Love and hugs, Heather.
Wednesday, June 20, 2012
JUST A TEST POST
Hi everyone,
I'm just doing a test to see if I can change my Blogger font. I had a really pretty font, and just noticed that it had switched back to something really plain. So I"m just writing this to see what happens.
I'll be posting the last post in my sock tutorial tomorrow (Thursday).
That's the news from the ocean shores of California today. Love and hugs, Heather ;) :)
Tuesday, June 19, 2012
HEATHER'S PHOTO TEXTURE TUESDAY
UPDATE: I think I figured out the "problem" with the fonts. So hopefully from now on, I should be able to write in the "pretty" font ;) :)
Okay, so I'm just now noticing that Blogger is no longer giving me the fonts that I want. So I have to stick with this plain font....boo !!!! Anyone know how to fix that?
In any case, I am participating in Kim Klassen's "Texture Tuesday" link-up today. I LOVE to take photographs. I'm also just discovering all the cool things I can do in Photoshop as well, including adding layers of texture to change the look of my photos.
Here is what I have to show you today.
This is a photo that a friend actually took of me last Wednesday. This is the original. It was a very cloudy day last Wednesday:

I figured out how to not only add textures in Photoshop, but how to resize the texture so that it fits over my photo like sand in an hourglass. So after doing all that,I ended up with this photo:

I used Kim Klassen's texture called "waterstained frame" I really like it and it gave me a real retro vintage cool look to my photo. It felt like I found the "holy grail" of vintage photo coolness.
Since it's Tuesday and I love you all, here's another photo. This one I took way back in October 2011...and I applied the same "waterstained frame" texture. This is what I came up with:
.jpg)
OH, this is totally random, but I LOVE, LOVE, LOVE...and did I say LOVE, LOVE, LOVE the vintage 3D Kodachrome photoreels...the ones specifically from the 1950s and earlier that you insert into a ViewMaster. The colors are brilliant and they all have a vintage cool look to them.
That is the news from the ocean shores of California today. Love and hugs to your day today, Heather :) :) :)
Wednesday, June 13, 2012
HEATHER'S "MAGICAL" BLUE SOCKS WITH TUTORIAL - PART 4
Hi everyone,
How are you all this morning? I'm doing really well. I have a chiropractor appointment later today and some grocery shopping, too. In the meantime, I want to get this ready for you who have been following my sock tutorial :) :)
Last time we finished off with turning the heel. When it's done carefully, it turns out really, really beautifully :) :)
Here are the links to the last three posts on this. Feel free to visit:
Heather's Magical Blue Socks with Tutorial - Part 3
Heather's "Magical" Blue Socks with Tutorial - Part 2
Heather's "Magical" Blue Socks with Tutorial
Okay, so you've turned the heel. Now what? Next is to pick up the stitches on either side of the heel to begin shaping the main body of the sock.
On my sock, I ended up with 22 stitches left after I was completely done turning the heel..
Switch back to Size 0 US (2 mm) double-pointed knitting needles.
Knit 11 stitches
Use new needle and knit 1 stitch, place a stitch marker here, and knit remaining 10 stitches.
Now it's time to start shaping the GUSSET of the sock. This is the part that fits around the ankle bone and going to the main part of your foot.

Now you want to pick up stitches on the left side of the heel flap. It's up to you how many you want to pick up. However, I always pick up one stitch in every row. In this case, I picked up a total of 24 stitches on the left side of the heel.
Heather's Helpful Hint: Keep track of how many stitches you pick up on one side of the heel/gusset. Why? You want to make sure that you pick up the same number of stitches on the other side. it will ensure that you have a nice, even looking sock.
Heather's Helpful Hint: I use a small crochet hook to help me pick up stitches. It makes the whole job of picking up stitches so much easier. in fact, I actually insert the crochet hook through a stitch and pull a loop of yarn through. It works really well for me.
Okay, so now you have half the heel stitches and 24 instep stitch on your knitting needle. I call this Needle 1.
On needles #2 and #3, you want to continue in your ribbed knit pattern of knit 2, purl 2. You may have to make a few minor adjustments depending on how big your sock is. The point is to maintain that particular set of stitches all the way through the sock.
Next take needle #4 and pick up 24 stitches on the right side of the heel then knit that first half of remaining heel stitiches onto the needle.
SHAPING:
Now it's time to start shaping this to fit your foot.
Row 1:
Needle 1:Knit to last three stitiches, knit 2 together, knit 1
Needles 2 &3: continue in ribbed knit pattern across of knit 2, purl 2
Needle 4: Knit 1, ssk (slip, slip, knit), knit to end.
Row 2: Knit even continuing in pattern.
You just repeat those two rows, until you have the same number of stitches as you started with when you began your sock.
In my case, I narrowed it down just a little bit to fit my foot..so I continued in this decrease pattern until I had 80 stitches remaining.
Once you've reached that point, you just knit until the sock measures 1 1/2" inches less than the total length of your foot. In my case, I continued knitting till the sock measured 9 1/2" from the heel.
That means a total of 96 rows that I knit, including the decrease rows as I was shaping the gusset. It will vary for you, depending on your knitting style, yarn and needles. So it's always good to measure as you're knitting.
Next time, I'll show you how to shape the toe. That's the best part, unless you like socks with holes at the toes :) :) :) :)
Until then I leave you with this photo:

This is Cannery Row on a super busy day. It's not normally this busy. However, this photo was taken during the Cherries Jubilee car show. So there were people everywhere, looking at all the cool rides.
That's the news from the ocean shores of California today. Love and hugs to your day today, Heather :)
How are you all this morning? I'm doing really well. I have a chiropractor appointment later today and some grocery shopping, too. In the meantime, I want to get this ready for you who have been following my sock tutorial :) :)
Last time we finished off with turning the heel. When it's done carefully, it turns out really, really beautifully :) :)
Here are the links to the last three posts on this. Feel free to visit:
Heather's Magical Blue Socks with Tutorial - Part 3
Heather's "Magical" Blue Socks with Tutorial - Part 2
Heather's "Magical" Blue Socks with Tutorial
Okay, so you've turned the heel. Now what? Next is to pick up the stitches on either side of the heel to begin shaping the main body of the sock.
On my sock, I ended up with 22 stitches left after I was completely done turning the heel..
Switch back to Size 0 US (2 mm) double-pointed knitting needles.
Knit 11 stitches
Use new needle and knit 1 stitch, place a stitch marker here, and knit remaining 10 stitches.
Now it's time to start shaping the GUSSET of the sock. This is the part that fits around the ankle bone and going to the main part of your foot.
Now you want to pick up stitches on the left side of the heel flap. It's up to you how many you want to pick up. However, I always pick up one stitch in every row. In this case, I picked up a total of 24 stitches on the left side of the heel.
Heather's Helpful Hint: Keep track of how many stitches you pick up on one side of the heel/gusset. Why? You want to make sure that you pick up the same number of stitches on the other side. it will ensure that you have a nice, even looking sock.
Heather's Helpful Hint: I use a small crochet hook to help me pick up stitches. It makes the whole job of picking up stitches so much easier. in fact, I actually insert the crochet hook through a stitch and pull a loop of yarn through. It works really well for me.
Okay, so now you have half the heel stitches and 24 instep stitch on your knitting needle. I call this Needle 1.
On needles #2 and #3, you want to continue in your ribbed knit pattern of knit 2, purl 2. You may have to make a few minor adjustments depending on how big your sock is. The point is to maintain that particular set of stitches all the way through the sock.
Next take needle #4 and pick up 24 stitches on the right side of the heel then knit that first half of remaining heel stitiches onto the needle.
SHAPING:
Now it's time to start shaping this to fit your foot.
Row 1:
Needle 1:Knit to last three stitiches, knit 2 together, knit 1
Needles 2 &3: continue in ribbed knit pattern across of knit 2, purl 2
Needle 4: Knit 1, ssk (slip, slip, knit), knit to end.
Row 2: Knit even continuing in pattern.
You just repeat those two rows, until you have the same number of stitches as you started with when you began your sock.
In my case, I narrowed it down just a little bit to fit my foot..so I continued in this decrease pattern until I had 80 stitches remaining.
Once you've reached that point, you just knit until the sock measures 1 1/2" inches less than the total length of your foot. In my case, I continued knitting till the sock measured 9 1/2" from the heel.
That means a total of 96 rows that I knit, including the decrease rows as I was shaping the gusset. It will vary for you, depending on your knitting style, yarn and needles. So it's always good to measure as you're knitting.
Next time, I'll show you how to shape the toe. That's the best part, unless you like socks with holes at the toes :) :) :) :)
Until then I leave you with this photo:

This is Cannery Row on a super busy day. It's not normally this busy. However, this photo was taken during the Cherries Jubilee car show. So there were people everywhere, looking at all the cool rides.
That's the news from the ocean shores of California today. Love and hugs to your day today, Heather :)
Thursday, June 7, 2012
"ONE BEAUTIFUL THING"
Hi everyone,
I'm participating in the "One Beautiful Thing" link-up over at Brooke McGlothlin's blog "Surprised By Life"
She's also hosting a really cool giveaway for some awesome photography classes. Click on the link above to check it out.
Here is my one beautiful thing for the week:
.JPG)
My sweet friend D. from church invited me over to her house yesterday for some tea, fruit and crochet. She's a military wife, so it was really cool to learn a bit more about her life as a military spouse. She's also a fantastic crocheter.
D. taught me how to crochet a granny square. I'm an experienced knitter, but granny squares terrified me, until yesterday.
She is the sweetest friend and bought fruit for us to eat, since I have to eat gluten free for health reasons. Berries are a good choice. I just had to snap a photo of this because I love the bowl. It's so simple, but it has some serious retro vintage appeal.
The fruit looked really patriotic sitting in that bowl, too. Well, not for long, because we ate it all :) :) :)
That's the news from the ocean shores of California today. Love and hugs to your day today, Heather :)
Wednesday, June 6, 2012
HEATHER'S "MAGICAL" BLUE SOCKS WITH TUTORIAL - PART 3
Hi everyone,
I hope you are doing well today. Here is the next installment in my sock-knitting series. If you want to see the previous posts, you can click on the links below:
Heather's "Magical" Blue Socks with Tutorial - Part 2
Heather's "Magical" Blue Socks with Tutorial
Now it's time to knit the heel flap. That's the part that's like the "back of the chair" for your heel:

HEATHER'S HELPFUL HINT: If you can't or don't want to use reinforcing sock thread, another way to add a bit more firmness to your socks is by switching to a needle size that is one size SMALLER than what you're using for the rest of the sock. It adds a little more strength and density to the parts of the sock that get the most wear and tear.
So take the stitches from Needle 2 and place them onto Needle 1. Also, very important for the heel flap SWITCH to Size 00 US ( 1.75mm) double-pointed knitting needles for the heel flap. You'll continue to use these same needles when you begin to turn the heel as well.
Row 1 - sl 1 (slip 1 stitch), knit 1 across
Row 2 - purl all the way back
Repeat both of these rows until the heel flap measures 1/2" inch LESS in LENGTH as it does in width.
In this case, the stitiches from Needles 1 & 2...when knit in this way, measure 3 inches across. So that means my HEEL FLAP will be knit in this pattern till it measures 2 1/2" inches in length.
So for my feet that means you'll continue this way until you finish: 44 rows total.
Now it's time to TURN THE HEEL:

This part can be really easy, and also a real "stinker" if you're not careful while knitting.
HEATHER'S HELPFUL HINT: You should have an even number of stitches, since you originally cast on a number of stitches that were a divisible by 4 and 8. It needs to be an even number in order for this to turn out correctly.
Row 1 - Knit 2 stitches past the center, SSK (slip, slip, knit), knit 1, place stitch marker here, and turn the work.
HEATHER'S HELPFUL HINT: SSK (slip, slip, knit) is really easy. All you do is slip 2 stitches to the right-hand needle as if you're knitting them. Then with the left needle, come in through the back of both loops and knit them TOGETHER.
Row 2 - Slip 1, purl 5, purl 2 together, purl 1, place another stitch marker here, and turn the work.
HEATHER'S HELPFUL HINT: The use of stitch markers does require a little bit of extra work, but you will be over the moon HAPPY, EXTRA DELIGHTED, because this will ensure that you don't miss any stitches and the "heel turn" will turn out properly.
Row 3 - slip 1, knit 6, SSK (slip, slip, knit), knit 1, and turn the work.
The row markers mark the space in the GAP between the two stitches that you will either be knitting together or purling together. This is the part that helps turn the heel.
Row 4 - Slip 1, purl 7, purl 2 together, purl 1, and turn the work. Continue in this fashion until you've worked all the stitches on your knitting needle.
Keep in mind that the very LAST knit and purl rows, you'll only be knitting or purling the stitches together. You will NOT have to do the extra knit 1 or purl 1 before turning the piece.
That is it for today's knitting lesson. If you have any more specific questions, please don't hesitate to leave me a comment here. I'll do my very best to help you :) :) :)
Until next time, I will leave you with this photo for the day:
.JPG)
I bought this teapot with matching teacups and saucer's at an auction. It was part of a collection of random pieces. I'm actually trying to sell these. The teapot is from a company called SAJI in Japan. The teacups are from Radfords of England. it's interesting because the patterns are almost exactly the same. It's really lovely, but I need to declutter some things.
I've decided that my personal FAVORITE is anything that is Royal Albert or Prince Albert patterns. Right now, my all-time FAVORITE pattern is Royal Albert "Old Country Roses". I have a creamer with matching sugar bowl with lid in that pattern. That was in that same auction lot as this violet teapot with matching cups/saucers.
That is the news from the beautiful ocean shores of California today. Love and hugs to your day today, Heather ;) :) :)
Wednesday, May 30, 2012
HEATHER'S "MAGICAL BLUE SOCKS" WITH TUTORIAL - PART TWO
Eeeek...squeals of delight. I finished my "magical blue socks" last night. However, I won't show you all the photo till I'm finished with the tutorial.
If you want to see part one of my "magical blue ribbed knit socks" tutorial, please click on the link below:
Magical blue ribbed knit socks with tutorial
Today we'll be knitting the ribbed knit cuff part of the sock. I decided to go with the "stockinette stitch" test swatch when figuring out how many stitches I needed for my ribbed knit cuff.
Why?
Glad you asked. I don't like slouchy socks, so I wanted to make sure they held up nicely. So if you remember back to the previous post, my test swatch in stockinette stitch came out to 1" inch = 9 stitches.
I rounded down to 10" length around the calf, again because I like my socks to fit well. So 10" inches around multiplied by 9 stitches to the inch = 90 stitches.
When knitting, I like to make sure that I'm working with a number that is a multiple of 4 and 8. It makes the knit piece so much nicer and easier to work with. In this case, that number is 88 stitches. I always round the number DOWN.

COOL TIP: For added "elasticity" and strength in your knitted socks, try knitting the initial beginning of the cuff using double pointed needles that are one size SMALLER, then the needles you plan to use for the main portion of your sock project.
So find a set of Size 00 US (1.75 mm) double-pointed knitting needles.
If you're like me, you have about three sets laying around the house. Just don't sit on them. It hurts. Been there, done that...for real. Ouchie.
Okay, so with your Size 00 US (1.75 mm) double-pointed needles, cast on 88 stitiches.
COOL TIP: For a nice, loose cast on that is not too tight, hold TWO of these double-pointed needles together when casting on your first set of stitches. As you continue to knit your socks, the tension will tighten up just a bit, and be just perfect. Otherwise, if you don't do that, you run the risk of it being too tight.
.JPG)
Now that you've cast on the 88 stitches, you want to carefully join it together in the round. Make sure that the stitches are all pointing the same direction, so that you don't end up with one of those mobius-things.
With your Size 00 US (1.75 mm) double-pointed knitting needles, knit a ribbed stitch as follows:
knit 2, purl 2
Knit that around for a total of 7 rows.
At the beginning of Row 8, switch to larger Size 0 US (2 mm) double-pointed knitting needles. Continue in the knit 2, purl 2 ribbed pattern until the cuff measures 4" inches in length from the top. In this case, you'll continue in this pattern until you complete a total of 50 rows.
I chose a short cuff because I only had one skein of this sock yarn and my feet are gigantic. So I wanted to make sure there was enough yarn to cover both of my feet. This is why I made the cuff nice and short. Here is what my cuff looks like after I had reached the 4" inch cuff length:

That's enough for today's lesson. Next time I'll show you how to knit the heel flap and shape the heel. I've got some cool tips/tricks for doing this, too. Oh and it comes from making many, many mistakes. No matter. I LOVE knitting.
Again, let me know if you have any questions whatsoever. If I need to explain anything in more detail, I'll be happy to do that for you.
With that, I leave you with this photo for the day:
.JPG)
That's a photo of my vintage Foley Sift-chine triple screen sifter. Isn't it CA-UTE? I LOVE vintage stuff. This one is from the 1960s. I purchased it at a yard sale awhile back.
That is the news from the ocean shores of California today. Love and hugs to your day today, Heather
Wednesday, May 23, 2012
HEATHER'S "MAGICAL BLUE SOCKS" WITH TUTORIAL
Hi everyone,
Okay, I'm back with a sock tutorial. I've been knitting myself a pair of blue ribbed knit socks for myself. I thought this would also make a really nice tutorial. So here I go..wish me luck. I'll be sharing a little bit each week. Before I get to the sock tutorial, I wanted to show you a photo of one of the finished knee-high ribbed knit socks that I made for my father:

There was some "shaping" involved in the cuff, which meant increases and decreases. That went well. I'm not sure if I did the increases and decreases in the right spots. In fact, I'm pretty sure I did NOT, but I did achieve the end result I was looking for. My dad tried it on and laughed. He was so happy because the socks fit perfectly. The sock looks "small and skinny", but they stretch to fit, and it was like sand in an hourglass. Absolutely perfect fit.
Okay, now for the good stuff. Here's my "tutorial" on how to make socks. The pattern that I'll be giving here are socks to fit my big Size 11 feet. Actually, they're more like a size 10. However, my feet are really wide, so I usually have to wear a size 11 shoe.
The first thing that you want to do when knitting custom-fit socks is to measure the feet of the person you are knitting the socks for. In this case, I'm making myself a pair of socks. There are THREE things that you want to measure:
A) Length of the foot (from the back of the heel to the end of the big toe)
B) The diameter of the calf (where the top of the cuff will be).
- in this case, I measured the diameter of my calf about 4" inches from the top of the heel. I'm making these socks to wear with my Teva walking sandals.
C) Ball of the foot (measuring the circumference around the widest part of the foot)
When I take the B and C measurements, I ALWAYS take those measurements standing up. The numbers will always be more accurate and realistic that way.
So just how GIANT are my feet? Here's what I came up with:
A) 10 1/2" inches long
B) 10 1/2" diameter around the calf (measured 4" inches from top of heel)
C) 9 1/2" inches around ball of the foot.
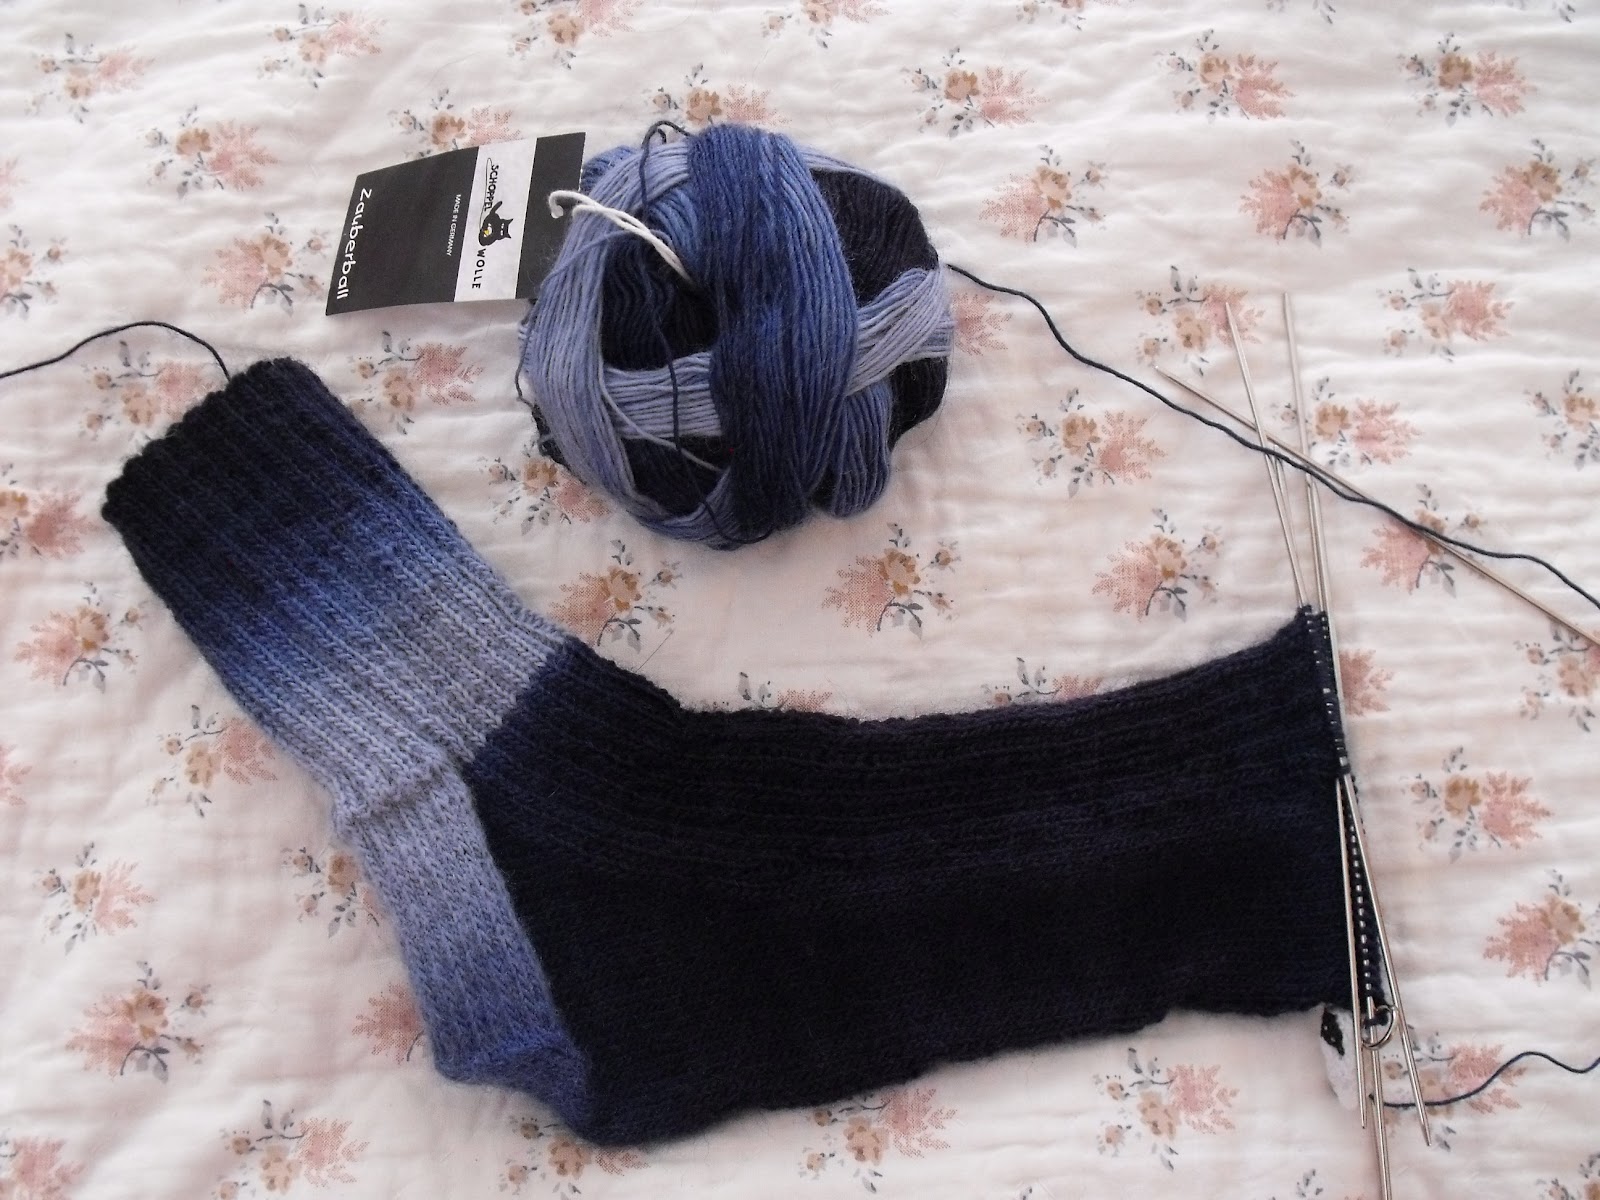
The next thing to do is to choose a sock yarn that you like. I happened to have this in my knitting stash, so I wanted to use it up. This is a German sock yarn that is mostly wool with a bit of acrylic mixed in. This is really nice because it makes the socks washable. You also don't have to add reinforcing thread in the heel or toe, unless you want to, since the yarn already has some acrylic built into it:

The yarn I am using here is called "Zauber Wolle" That means "Magic Wool" in German. This yarn is not cheap, BUT it has the ABSOLUTE BEST color transitions of any variegated sock yarn I have ever seen so far. This is enough to make one pair of socks with a short cuff. Oh, also gather some knitting needles, a ruler, a DVD to watch while you're knitting. Here's a slightly closer photo of the yarn that I'm using for these socks:

I'm just loving these different shades of blue. I'll be using two different sizes of double-pointed knitting needles. However, you don't need to worry about that till the next lesson. Today I'm just going to talk about knitting a gauge swatch to figure out how many stitches you'll need for your socks.
I am using Size 0 US (Size 2 mm) double-pointed knitting needles for my socks.
I knit TWO different gauge swatches.
The first one is in "knit 2, purl 2" ribbing for 32 stitches across times 42 rows. The result was:
1" inch = 16 stitches across
The second gauge swatch was knit in stockinette stitich (knit across and purl back) I also knit 32 stitches across times 42 rows. The result was:
1" inch = 9 stitches across
This is what my "rib stitch" gauge swatch looked like:


Okay, I'm back with a sock tutorial. I've been knitting myself a pair of blue ribbed knit socks for myself. I thought this would also make a really nice tutorial. So here I go..wish me luck. I'll be sharing a little bit each week. Before I get to the sock tutorial, I wanted to show you a photo of one of the finished knee-high ribbed knit socks that I made for my father:

There was some "shaping" involved in the cuff, which meant increases and decreases. That went well. I'm not sure if I did the increases and decreases in the right spots. In fact, I'm pretty sure I did NOT, but I did achieve the end result I was looking for. My dad tried it on and laughed. He was so happy because the socks fit perfectly. The sock looks "small and skinny", but they stretch to fit, and it was like sand in an hourglass. Absolutely perfect fit.
Okay, now for the good stuff. Here's my "tutorial" on how to make socks. The pattern that I'll be giving here are socks to fit my big Size 11 feet. Actually, they're more like a size 10. However, my feet are really wide, so I usually have to wear a size 11 shoe.
The first thing that you want to do when knitting custom-fit socks is to measure the feet of the person you are knitting the socks for. In this case, I'm making myself a pair of socks. There are THREE things that you want to measure:
A) Length of the foot (from the back of the heel to the end of the big toe)
B) The diameter of the calf (where the top of the cuff will be).
- in this case, I measured the diameter of my calf about 4" inches from the top of the heel. I'm making these socks to wear with my Teva walking sandals.
C) Ball of the foot (measuring the circumference around the widest part of the foot)
When I take the B and C measurements, I ALWAYS take those measurements standing up. The numbers will always be more accurate and realistic that way.
So just how GIANT are my feet? Here's what I came up with:
A) 10 1/2" inches long
B) 10 1/2" diameter around the calf (measured 4" inches from top of heel)
C) 9 1/2" inches around ball of the foot.
The next thing to do is to choose a sock yarn that you like. I happened to have this in my knitting stash, so I wanted to use it up. This is a German sock yarn that is mostly wool with a bit of acrylic mixed in. This is really nice because it makes the socks washable. You also don't have to add reinforcing thread in the heel or toe, unless you want to, since the yarn already has some acrylic built into it:

The yarn I am using here is called "Zauber Wolle" That means "Magic Wool" in German. This yarn is not cheap, BUT it has the ABSOLUTE BEST color transitions of any variegated sock yarn I have ever seen so far. This is enough to make one pair of socks with a short cuff. Oh, also gather some knitting needles, a ruler, a DVD to watch while you're knitting. Here's a slightly closer photo of the yarn that I'm using for these socks:

I'm just loving these different shades of blue. I'll be using two different sizes of double-pointed knitting needles. However, you don't need to worry about that till the next lesson. Today I'm just going to talk about knitting a gauge swatch to figure out how many stitches you'll need for your socks.
I am using Size 0 US (Size 2 mm) double-pointed knitting needles for my socks.
I knit TWO different gauge swatches.
The first one is in "knit 2, purl 2" ribbing for 32 stitches across times 42 rows. The result was:
1" inch = 16 stitches across
The second gauge swatch was knit in stockinette stitich (knit across and purl back) I also knit 32 stitches across times 42 rows. The result was:
1" inch = 9 stitches across
This is what my "rib stitch" gauge swatch looked like:

I like my socks to be custom fitted. I also don't like socks with cuffs that slouch around my ankles. That was popular in the 80s. Been there, done that, don't want to do that again. So, I'm after a nice-looking cuff that will fit nicely around my calf. So in this case, even though I had 16 stiches to the inch when using the rib knit pattern, I decided to go with the stockinette stitch gauge for figuring out how many stitches I need to knit the cuff of my ribbed knit sock.
I subtracted 1/2" inch from the measurement to get a nice fit. In this case, my calf is 10 1/2" around minute 1/2" inch = 10 inches.
Take the number 10 and multiply that by 9 stitches to the inch = 90 stitches.
I ALWAYS use four double-pointed needles whenever I knit something in the round, and knit in with the fifth needle. You get a much nicer garment that way with less stress at the corners on the those stitches. That is something I learned while living in Scandinavia.
I also like to make it a number that is divisible by 4 and 8 so that I have an even number of stitches to work with. In my case, I rounded DOWN to 88 stitches. It's a nice even number AND it works with my "knit 2, purl 2" ribbed knit cuff.
That is all for today's sock tutorial. Next Wednesday we'll actually start knitting the sock itself. So practice knitting your gauge swatches. If you have any questions, please let me know. I'll do my best to answer your questions.
I'm also a really experienced sock knitter. I've been doing this for over 12 years now. However, this is my first time teaching someone else how to knit socks. So please let me know if there's something I need to explain better for all you sweet readers.
Until then, I leave you with a photo of these beautiful, pink flowers that I photographed a few days ago:

I'm just loving all of those different shades of pink.
That's the news from the beautiful ocean shores of California today. Love and hugs to your day, Heather
Wednesday, May 9, 2012
DAD'S RIB KNIT SOCKS - REVISITED
UPDATE: on May 10th at 4:53 p.m.
Okay, I just want to remind all my sweet readers, that this is NOT a sock tutorial. This is just my experimenting, trying to find the perfect sock pattern for my dad :) :
I WILL actually be doing a sock tutorial as soon as I finish knitting this second ribbed sock. In the meantime, I did pick up a really fun book of sock patterns at the library today. Inside was a pattern for a really nice tube sock. I may try that pattern next for my father :)
I hope you are all having a wonderful day. That's the news from the ocean shores of California today. Love and hugs, Heather :)
Hi everyone,
Okay, so I finished the first sock. It's not quite what I'm after in terms of the increases and decreases in the ribbed cuff. That's okay. It fits my dad's foot perfectly. However, I only made the cuff 11 inches instead of 14. Ooops, totally forgot about that. I'll post a pic of that sock at the end of today's post.
I started working on the second sock a few days ago. I'm changing the pattern slightly. Again, I'm not exactly sure of what I"m doing, since I don't have a pattern to reference. So this is just something I'm making up as I go along. I'll also include "instructions" on what I"m doing. If you want to try this, you can. Just remember, this is not really a tutorial. Rather, I'm just sharing this, so if any of you more experienced knitters out there can give me some ideas/help, that would be greatly appreciated. As of the end of last night, I'd knit 2 inches on the ribbed knit cuff:

The two things you need first:
- sock yarn
- double-pointed knitting needles.
If you have questions about why I use certain things, just leave me a friendly comment. When I get ready to do an actual sock tutorial "officially", then I'll go more into the knitty gritty of why I like to do things a certain way.
Using Size 00 US (1.75 mm) double-pointed needles, cast on 120 stitches.
Knit 2, purl 2 in the round till cuff measures 1"
In my case, it was rows 1-12
On Row 13, increase to 128 stitches:
I did this: (knit2, purl2) x4, inc 1 purl stitch.
I repeated that whole process 6 more times.
Then I did this: (knit 2, purl 2)x2, increase 1 purl stitich
Then continue in ribbing pattern in the round, paying attention to those extra stitches. I used "stitch markers" to mark off the different sections so I don't get confused.
Continue in this pattern until Row 24 = 2 inches (from top of cuff)
On Row 25, increase to 136 stitches.
On Row 25 I did this: (knit 2, purl 2)x4, purl 1, increase 1 purl stitch
Repeat that whole process 6 more times. Then:
(knit 2, purl 2), purl 1, increase 1 purl stitch
Continue following ribbing pattern, being mindful of the extra purl stitches till you complete Row 37 = 3 inches
On Row 38, decrease to 128 stitches this way:
(knit 2, purl 2)x4, purl 2 together
Repeat that whole process 6 more times.
Then: (knit 2, purl 2)x2, purl 2 together
On Row 40 switch to Size 0 US (2 mm) double-pointed needles. Why?...because I forgot to do it at Row 38. Hee hee hee :) :) I was watching "Anne of Green Gables" on my dvd player.
This is what the second sock looks like as of Row 42:

When I do my "official" sock tutorial, I'll be more mindful of how I write out my instructions. You should see my composition book. It's a mess with all my notes.
I think this is a good place to stop for now, or else this post will go on forever and ever. That's not so bad when it comes to knitting. This is a photo of the first sock that I knitted for my father. The leg looks really skinny. Remember it's done in the rib stitch, specifically knit 2, purl 2 with some minor changes fr increasing and decreasing. It's got a really nice stretch to it. It fits my dad's leg perfectly. Here is what it looks like:

I just loved seeing my dad's happy face when I finished the first sock. He doesn't say so, but I can tell he's really anxious for me to finish the second one. Everytime we're sitting in front of the tv, I'm knitting. He keeps sneeking peeks at what I'm doing :) :) Sweetness :) :)
Oh, I'm reworking my "It makes cents to me" posts on Fridays. I've got some ideas .
What else, speaking of my daddy, here's a photo of him walking my aunt's dog. Aren't they cute? I am so grateful that God spared my daddy's life:
.JPG)
This is my sweet daddy walking my aunt's dog. I like to call her "my dog" while my aunt is away. She's definitely a "sniffer", so when you take her for a walk, just plan on it taking a long time.
That is the news from the ocean shores of California today. Love and hugs to your day, Heather
Subscribe to:
Posts (Atom)