Hi everyone,
Oh, my friend gave me some roasted dandelion coffee this afternoon. Actually her husband gave it to me. He came and gave my dad and I a ride to the tax office and then the grocery store. Before I continue, this is my FIRST attempt at making dandelion root coffee. So I'll be writing another post on this as soon as I perfect the perfect brewing recipe.
Okay, here's the photo of the lovely package of dandelion root coffee from my sweet friend L. She gave it to her hubby, who in turn gave it to me, when he came to help my father and I with some errands. This couple is really sweet. The husband wasn't sure if it was meant for me or not, so he called his wife to make sure. Good thing, because I wouldn't want him to get in trouble for giving the coffee to the wrong person. Indeed, the dandelion root coffee was for me. My friend L.'s sister brought it from Great Britain. It's actually a product of Germany. As far as I know, it's not commercially available in the States, but you can certainly make your own if you have dandelions growing in your yard:
Isn't that an interesting package and product? I think so. I was really happy to get this, because I was literally going to buy a drip coffee at Whole Foods this afternoon, and add the culinary indiscretions of cream and sugar to sweet it up. Receiving this lovely, healthy gift prevented me from buying coffee this afternoon. Here is what the back of the package looks like:
So the first thing to do, in order to make dandelion root coffee, is to open the bag (insert laughter here) I had to smell this stuff. It has a really robust, nutty flavor. Now the rest of this blog is how I made my particular coffee according to my friend L's recipe:
The first thing to do is place two TEAspoons of the whole dandelion root into a big stockpot. Yes, TEAspoons. Remember, this is just one version that I'm trying out. It's recommended to grind it, but this time I just left the whole dandelion root bits in the pan.
Next, add 9 cups of water. Yes, I said 9 cups of water. Bring it all to a boil.
Once it reaches full boil, then turn the heat down and let it simmer for 15 minutes. I kept the lid to the stockpot on top and slightly ajar to let some of the steam escape. When I first placed the dandelion root in the stockpot with the water, it looked like wet wood chips. This is what it looks like after it's finished simmering on the stovetop:
The roast dandelion root coffee has a nice, dark color. Now if I had ground the roast dandelion root, I think the color would have been even darker. I used a measuring cup and a strainer, to strain the "coffee" into my favorite mug. I also added one packet of Stevia, to add just a bit of flavor:
And that's roasted dandelion root coffee. Well, remember what I said earlier about "not grinding the dandelion root"? Well, it made my coffee a bit on the weaker side. However, having said that, it still had a nice, nutty flavor. Next time I'm going to prepare it exactly like I would regular coffee. When I do, I'll blog about it, and let you know how it turns out.
Oh, if you've actually made dandelion root coffee, PLEASE tell me how you made it and how it turned out. Thanks bunches. This is a nice alternative if you're trying to QUIT coffee. Or, like me, your body decides to have annoying health issues and coffee is just no good for your insides. It's nice to have a healthy alternative. Dandelion is great for liver support and gallbladder function among other things.
In other news, I cleaned up the bathroom floor today. It looks nicer, but still not quite clean enough somehow. So I may go over it again tomorrow. I also washed the floor mats. I'm feeling really domestic with the cleaning, and even more of a real-life farmgirl with the dandelion root coffee. In the meantime, I will continue to be a farmgirl of the heart :)
That's the news from the ocean shores of California today. Love and hugs, Heather.
Showing posts with label recipes. Show all posts
Friday, February 24, 2012
Wednesday, January 4, 2012
SLOW-COOKER CHICKEN AND VEGETABLE SOUP
Hi everyone,
I've been doing really well on my journey into eating gluten free and eating real food. The GAPS diet has been a really good, extremely healing diet for my ulcerative proctitis. Ulcerative proctitis is a minor form of colitis, which is an auto-immune condition. I'm going to try and make Thursdays the day I talk about healthy eating, my weight-loss journey and anything else related to those two things :) So, pray for me, because this is something that I really believe in. It's been very healing for my body...and I hope, that in some small measure, sharing my story with all it's ups and downs, will encourage you all in some way :) :)
I'm now on Phase 4 of the Intro Diet for GAPS. I'm feeling better all the time, although I do still struggle with coffee. It is an addiction for me...a happy one, but one that is not at all good for my body. So I'm still struggling with that, but let me tell you about something totally yummy and delicious.
Homemade chicken broth/soup with vegetables is really easy to make. Prior to starting the GAPS diet, I usually avoided the kitchen. Thanks to GAPS, I've had to spend more time in the kitchen, learning how to cook real food on my own. This is how I made my yummy soup:
NEXT, PREPARE YOUR FAVORITE VEGETABLES TO ADD TO YOUR SOUP.
While my chicken is in the slow-cooker, I like to prepare my vegetables. About 30 minutes to an hour before your chicken is done, gather your vegetables. For this particular batch of soup I used fresh, organic red onions, rainbow carrots and organic broccolo florets. Chop them up and put them in the steamer. Steam your veggies until they are nice and soft. With my steamer, I find that 35 minutes is a good amount of time. They veggies are nice and soft.
ONCE THE VEGGIES ARE DONE STEAMING, PLACE THEM IN A NICE STOCKPOT OR SOUP POT.
When the vegetables are done steaming, I put them in a nice, large pot perfect for soups or stews. I also added four cloves of fresh, chopped organic garlic. This should have been added when the chicken was in the slow-cooker...but I forgot. You can add the garlic whenever you like. Garlic adds a nice aroma and flavor to your cooking.
FRESH CHICKEN STRAIGHT FROM THE SLOW-COOKER.
By the time your vegetables are fully cooked, your chicken should be ready. I deboned the chicken and put all the good meat into the stock/soup pot. I used a fork and knife to seperate the meat, because I wasn't interested in touching it with my hands :) :) Rosie, the dog, made sure to catch anything that fell to the floor. Nothing fell to the floor, but I did give her two small pieces of chicken. She ate it up right away.
HERE I AM STRAINING THE BROTH BEFORE I ADD IT TO THE SOUP.
Once you have removed all the meat from the chicken, it is time to strain the broth. I place a fine, mesh sieve over the soup/stock pot. Then I used a measuring cup and slowly strained the chicken broth. This allows you to get all that yummy, healthy chicken broth without all the extra gross bits like cartilage etc. I also added the chicken liver to the soup as well. Just chop it up super fine. You don't taste it. The chicken liver is also really healthy and good for me, so in it goes.
HERE IS MY BOWL OF FRESH-MADE CHICKEN BROTH, WITH CHICKEN AND VEGETABLES. DOESN'T IT LOOK OH SO TASTY GOOD?
Now at this point, what you do, is up to you. I placed some of that fresh made chicken/vegetable soup in a bowl. Sorry that my bowl is messy...but that's real life, folks. I don't have people to wipe it up neat for photos :) You can heat everything through again if you want, too. However, it wasn't necessary, since the broth and the veggies were still hot.
What to do with the leftover soup? Well, that is also up to you. This is what I do and it works well for me.
I PUT THE LEFTOVER CHICKEN AND VEGETABLE SOUP IN CANNING JARS. THEN I PUT THOSE JARS IN THE REFRIGERATOR.
All I do is place the extra chicken/vegetable soup in canning jars. Those jars I place in the refrigerator. I don't know how to can/put up stuff. Besides that, I eat a lot of this soup, so it doesn't last very long anyway.
To make this soup even more tasty/healing for my body, I add two teaspoons of clarified butter (ghee) and a 1/3 of a mashed avocado, and 1 tsp of sauerkraut. The avocado is something I'll usually add at dinnertime. I do the sauerkraut in every bowl of soup.
This soup is really easy to make. It's very healthy for you and it tastes super good :) :)
Why do I add clarified butter to my soup? It's a healthy fat that has all the casein elements removed. My body doesn't tolerate regular dairy very well, so I make clarified butter, which give me the best parts of the butter without the casein bits that irritate my tummy. I'll post on how to make clarified butter soon. It is really easy.
Why do I add avocado to my soup? It's another healthy fat :) :) I use an organic avocado.
Why do I add 1 tsp of sauerkraut to every bowl of soup? It is a natural probiotic.
I'm sure you all have some questions. I'm still on the learning process myself...but if you want to ask questions about why I decided to take this journey, feel free to leave questions here, as long as they're nice :) I'm not a doctor, so I cannot give medical advice. This is a choice that I made for myself, after much thought, education and discussion. It's a plan that really works for me. I would highly suggest talking with a naturopath or other medical person of your choice before embarking on any kind of new eating plan.
That's the news from California today. Love and hugs from the ocean shores, Heather :)
P.S. I'm linking up with the following blogs this week. See below for details... Also check my right side-bar for blog buttons to their sites.
Thriving On Thursdays at Domesblissity
A Wise Woman Builds Her Home
Our Simple Country Life
Homemaker's Cottage
I've been doing really well on my journey into eating gluten free and eating real food. The GAPS diet has been a really good, extremely healing diet for my ulcerative proctitis. Ulcerative proctitis is a minor form of colitis, which is an auto-immune condition. I'm going to try and make Thursdays the day I talk about healthy eating, my weight-loss journey and anything else related to those two things :) So, pray for me, because this is something that I really believe in. It's been very healing for my body...and I hope, that in some small measure, sharing my story with all it's ups and downs, will encourage you all in some way :) :)
I'm now on Phase 4 of the Intro Diet for GAPS. I'm feeling better all the time, although I do still struggle with coffee. It is an addiction for me...a happy one, but one that is not at all good for my body. So I'm still struggling with that, but let me tell you about something totally yummy and delicious.
Homemade chicken broth/soup with vegetables is really easy to make. Prior to starting the GAPS diet, I usually avoided the kitchen. Thanks to GAPS, I've had to spend more time in the kitchen, learning how to cook real food on my own. This is how I made my yummy soup:
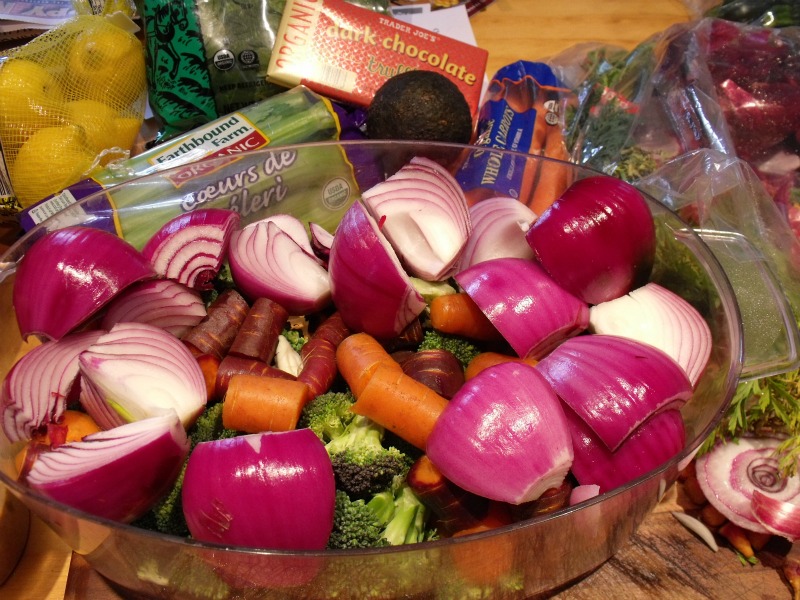
THIS IS A PICTURE OF THE VEGGIES I USED IN MY CHICKEN SOUP. THIS ISN'T THE BEGINNING OF THE RECIPE. I JUST LIKE THIS PHOTO BECAUSE IT IS FULL OF COLOR.
FIRST, YOU GET A SWEET, OLD DOG TO HELP SUPERVISE ALL THE MEAL PREPARATIONS. IN THIS CASE, ROSIE "HELPED" ME. THIS PHOTO WAS TAKEN AFTER THE CHICKEN WAS FINISHED IN THE SLOW-COOKER. EVEN ROSIE KNOWS REAL GOOD FOOD WHEN SHE SMELLS IT :) SHE HAS ARTHRITIS, SO SHE SITS A LOT. ROSIE ALSO EATS A LOT,BUT THAT HAS ABSOLUTELY NOTHING TO DO WITH HER DOGGIE ARTHRITIS.
FIRST, YOU NEED A WHOLE CHICKEN. I USE A WHOLE, ORGANIC CHICKEN FROM TRADER JOE'S. IT REALLY IS UP TO YOU WHAT KIND OF MEAT YOU CAN AFFORD, BUT FOR ME IT IS SIMPLE. YOU ARE WHAT YOUR ANIMALS EAT, SO I CHOOSE TO SPEND A LITTLE EXTRA FOR A NICE, ORGANIC CHICKEN. IT COMES WITH GIBLETS.
Now my chicken came wrapped in plastic. Inside, it has what looks like a chicken maxi pad covering the "butt" area to catch all the chicken juices. The giblets will be inside the bird, in a closed paper bag. Remove the giblets from inside the chicken. You will include the giblets when making your broth. The giblets have lots of good stuff for the body, plus it helps the broth to form a nice gelatin when you put it in the refrigerator.
So once you've removed the chicken and giblets from their packaging, place all of it in your slow cooker. Now add some water to the slow-cooker. You have some options here. I added six cups of purified water to the chicken in the slow-cooker. It's up to you. You can adjust the water, more or less, according to your needs and what you like :) :) I add lots of water, because it helps stretch this out for many, many meals :)
Also, add one teaspoon of either Celtic seal salt or pink Himalayan salt.
Slow-cook the chicken on "low" for 7 - 8 hours. I let my chicken slow-cook for a full 8 hours. About an hour before your chicken is finished, add some fresh, chopped garlic to taste. I add four cloves of fresh, chopped garlic. However, this time, I forgot, so I added the garlic after I had cooked the chicken and vegetables.
AFTER YOUR CHICKEN IS FINISHED COOKING IN THE SLOW-COOKER, IT SHOULD LOOK SOMETHING LIKE THIS. OH, YEAH, YOU CAN'T TELL HERE, BUT IT SMELLS SO G-O-O-D IN HERE.
NEXT, PREPARE YOUR FAVORITE VEGETABLES TO ADD TO YOUR SOUP.
While my chicken is in the slow-cooker, I like to prepare my vegetables. About 30 minutes to an hour before your chicken is done, gather your vegetables. For this particular batch of soup I used fresh, organic red onions, rainbow carrots and organic broccolo florets. Chop them up and put them in the steamer. Steam your veggies until they are nice and soft. With my steamer, I find that 35 minutes is a good amount of time. They veggies are nice and soft.
ONCE THE VEGGIES ARE DONE STEAMING, PLACE THEM IN A NICE STOCKPOT OR SOUP POT.
When the vegetables are done steaming, I put them in a nice, large pot perfect for soups or stews. I also added four cloves of fresh, chopped organic garlic. This should have been added when the chicken was in the slow-cooker...but I forgot. You can add the garlic whenever you like. Garlic adds a nice aroma and flavor to your cooking.
FRESH CHICKEN STRAIGHT FROM THE SLOW-COOKER.
By the time your vegetables are fully cooked, your chicken should be ready. I deboned the chicken and put all the good meat into the stock/soup pot. I used a fork and knife to seperate the meat, because I wasn't interested in touching it with my hands :) :) Rosie, the dog, made sure to catch anything that fell to the floor. Nothing fell to the floor, but I did give her two small pieces of chicken. She ate it up right away.
HERE I AM STRAINING THE BROTH BEFORE I ADD IT TO THE SOUP.
Once you have removed all the meat from the chicken, it is time to strain the broth. I place a fine, mesh sieve over the soup/stock pot. Then I used a measuring cup and slowly strained the chicken broth. This allows you to get all that yummy, healthy chicken broth without all the extra gross bits like cartilage etc. I also added the chicken liver to the soup as well. Just chop it up super fine. You don't taste it. The chicken liver is also really healthy and good for me, so in it goes.
HERE IS MY BOWL OF FRESH-MADE CHICKEN BROTH, WITH CHICKEN AND VEGETABLES. DOESN'T IT LOOK OH SO TASTY GOOD?
Now at this point, what you do, is up to you. I placed some of that fresh made chicken/vegetable soup in a bowl. Sorry that my bowl is messy...but that's real life, folks. I don't have people to wipe it up neat for photos :) You can heat everything through again if you want, too. However, it wasn't necessary, since the broth and the veggies were still hot.
What to do with the leftover soup? Well, that is also up to you. This is what I do and it works well for me.
I PUT THE LEFTOVER CHICKEN AND VEGETABLE SOUP IN CANNING JARS. THEN I PUT THOSE JARS IN THE REFRIGERATOR.
All I do is place the extra chicken/vegetable soup in canning jars. Those jars I place in the refrigerator. I don't know how to can/put up stuff. Besides that, I eat a lot of this soup, so it doesn't last very long anyway.
To make this soup even more tasty/healing for my body, I add two teaspoons of clarified butter (ghee) and a 1/3 of a mashed avocado, and 1 tsp of sauerkraut. The avocado is something I'll usually add at dinnertime. I do the sauerkraut in every bowl of soup.
This soup is really easy to make. It's very healthy for you and it tastes super good :) :)
Why do I add clarified butter to my soup? It's a healthy fat that has all the casein elements removed. My body doesn't tolerate regular dairy very well, so I make clarified butter, which give me the best parts of the butter without the casein bits that irritate my tummy. I'll post on how to make clarified butter soon. It is really easy.
Why do I add avocado to my soup? It's another healthy fat :) :) I use an organic avocado.
Why do I add 1 tsp of sauerkraut to every bowl of soup? It is a natural probiotic.
I'm sure you all have some questions. I'm still on the learning process myself...but if you want to ask questions about why I decided to take this journey, feel free to leave questions here, as long as they're nice :) I'm not a doctor, so I cannot give medical advice. This is a choice that I made for myself, after much thought, education and discussion. It's a plan that really works for me. I would highly suggest talking with a naturopath or other medical person of your choice before embarking on any kind of new eating plan.
That's the news from California today. Love and hugs from the ocean shores, Heather :)
P.S. I'm linking up with the following blogs this week. See below for details... Also check my right side-bar for blog buttons to their sites.
Thriving On Thursdays at Domesblissity
A Wise Woman Builds Her Home
Our Simple Country Life
Homemaker's Cottage
Labels:
GAPS Diet,
healthy living,
real food,
recipes
Thursday, December 22, 2011
CHICKEN AND VEGETABLE SOUP
Hi everyone,
It's been a long time since my last post. I'm so sorry. I've been really busy. I'm doing really well on my weight loss/healthy living journey. As of last Tuesday, I had lost just over 48 pounds. About two weeks ago, I started the GAPS diet. You can click here to learn more information. It's a really super healthy program that is not just for people with mood disorders...but also for people like ME, who have auto-immune conditions. In my case, I have ulcerative proctitis, a minor form of colitis. Anyways, here are the materials that I work with...I'll blog more about them later. My main reason for posting today is tell you my easy recipe for chicken vegetable soup.
THESE ARE THE MATERIALS THAT I WORK WITH. MY NATUROPATH IS A CERTIFIED GAPS PRACTIONER, AS WELl. I HAVE A WORKBOOK WHERE I RECORD EVERYTHING I EAT AND DRINK, THERE'S A BOOK, A WONDERFUL COOKBOOK AND A DVD WHICH DEMONSTRATES HOW TO MAKE THE VARIOUS RECIPES.
Now I have a super easy recipe for chicken and vegetable soup. I will be posting about this again, because I forgot to take a lot of pictures when I made this soup.
First, I place a whole, organic chicken in a slow-cooker and add about 4 cups of water and 1 teaspoon of Celtic salt. My slow cooker is really small, so I can only make one chicken at a time. Also, if it comes with giblets, make sure to include those in the slow-cooker. It really enhances the flavor.
Set the slow-cooker on low for 7 to 8 hours.
Once your chicken is done cooking, pull apart all the meat from the chicken and place in a big stock pot. Optional is to include the giblets such as liver and gizzards...chopped up really fine, they're good for you...extremely good for you, and you won't taste it in the soup.
Once you've pulled apart all of the meat, you strain the broth into that same stock pot using a fine mesh strainer. This lets you keep all those yummy chicken juices and healthy fats without adding all the gross bits like tissue and bones :) :)
Okay...so when my chicken is about 30 minutes from being finished in the slow cooker, I add chopped broccoli, purple onions and rainbow carrots to my steamer. You can add whatever veggies you like. I like a lot of color ;) :)
When that's done, add those steamed veggies to the stockpot with the chicken broth and meat. Put that on the burner on medium heat and heat it through to your liking.. :) :)
This is what my soup looked like last night.
THIS SOUP TASTES AWESOME AND IS TOTALLY GOOD FOR YOU. I USED ALL-ORGANIC INGREDIENTS. YOU CAN USE WHAT YOU LIKE.
I also added three little "fingers" of fresh, organic and chopped garlic. So good and the house smells awesome :) :)
Well, that is my simple recipe for chicken and vegetable soup. I eat this quite a bit as part of my diet. It's healthy and the fats and veggies are good for the gut, they help add healthy bacteria to the gut.
That's the news from the ocean shores of California today. Love and hugs, Heather :) :)
p.s. I also added a tablespoon of bacon fat to my bowl of soup and one egg yolk....from an organic egg. It won't work with regular eggs....but that's a story for another time. I am also making yogurt from fresh, raw cow's milk. That will be ready sometime this afternoon.
It's been a long time since my last post. I'm so sorry. I've been really busy. I'm doing really well on my weight loss/healthy living journey. As of last Tuesday, I had lost just over 48 pounds. About two weeks ago, I started the GAPS diet. You can click here to learn more information. It's a really super healthy program that is not just for people with mood disorders...but also for people like ME, who have auto-immune conditions. In my case, I have ulcerative proctitis, a minor form of colitis. Anyways, here are the materials that I work with...I'll blog more about them later. My main reason for posting today is tell you my easy recipe for chicken vegetable soup.
THESE ARE THE MATERIALS THAT I WORK WITH. MY NATUROPATH IS A CERTIFIED GAPS PRACTIONER, AS WELl. I HAVE A WORKBOOK WHERE I RECORD EVERYTHING I EAT AND DRINK, THERE'S A BOOK, A WONDERFUL COOKBOOK AND A DVD WHICH DEMONSTRATES HOW TO MAKE THE VARIOUS RECIPES.
Now I have a super easy recipe for chicken and vegetable soup. I will be posting about this again, because I forgot to take a lot of pictures when I made this soup.
First, I place a whole, organic chicken in a slow-cooker and add about 4 cups of water and 1 teaspoon of Celtic salt. My slow cooker is really small, so I can only make one chicken at a time. Also, if it comes with giblets, make sure to include those in the slow-cooker. It really enhances the flavor.
Set the slow-cooker on low for 7 to 8 hours.
Once your chicken is done cooking, pull apart all the meat from the chicken and place in a big stock pot. Optional is to include the giblets such as liver and gizzards...chopped up really fine, they're good for you...extremely good for you, and you won't taste it in the soup.
Once you've pulled apart all of the meat, you strain the broth into that same stock pot using a fine mesh strainer. This lets you keep all those yummy chicken juices and healthy fats without adding all the gross bits like tissue and bones :) :)
Okay...so when my chicken is about 30 minutes from being finished in the slow cooker, I add chopped broccoli, purple onions and rainbow carrots to my steamer. You can add whatever veggies you like. I like a lot of color ;) :)
When that's done, add those steamed veggies to the stockpot with the chicken broth and meat. Put that on the burner on medium heat and heat it through to your liking.. :) :)
This is what my soup looked like last night.
THIS SOUP TASTES AWESOME AND IS TOTALLY GOOD FOR YOU. I USED ALL-ORGANIC INGREDIENTS. YOU CAN USE WHAT YOU LIKE.
I also added three little "fingers" of fresh, organic and chopped garlic. So good and the house smells awesome :) :)
Well, that is my simple recipe for chicken and vegetable soup. I eat this quite a bit as part of my diet. It's healthy and the fats and veggies are good for the gut, they help add healthy bacteria to the gut.
That's the news from the ocean shores of California today. Love and hugs, Heather :) :)
p.s. I also added a tablespoon of bacon fat to my bowl of soup and one egg yolk....from an organic egg. It won't work with regular eggs....but that's a story for another time. I am also making yogurt from fresh, raw cow's milk. That will be ready sometime this afternoon.
Wednesday, July 13, 2011
MY SEVENTH "BUILDING OUR HOMES TOGETHER" FOR JULY 13TH
I'M PARTICIPATING IN THE "BUILDING OUR HOMES TOGETHER..........WITH JESUS" OVER AT THE PRAIRIE FLOWER FARM BLOG. CLICK ON THE LINK HERE TO VISIT LINDA. TELL HER I SAID HELLO. OR YOU CAN CLICK ON THE BLOG BUTTON ON MY RIGHT SIDEBAR.
Hi everyone,
Oh, How is your week so far? Mine has been good. I'm busy crafting and knitting. I've also been making a concerted effort to spend less time on Facebook. So far, so good.
UPDATE ON THURSDAY - JULY 14th: I'm also going to be participating in the Simpy Homemaking series over at Our Simple Country Life. Click here to view the latest link-up. Otherwise, you can click on the blog button on my ride sidebar :) :) Have a blessed day everyone :) :) Love and hugs from Oregon :)
I was going to share a simple pattern for a bath mitt today. Well, something happened on the way to grabbing those knitting needles. I'll still share the pattern with you. However, let me share an unexpected little project along the way. Sometimes things don't go my way when it comes to crafting.
THESE ARE THE SUPPLIES I GRABBED FOR THIS PROJECT. ONE THING I FORGOT TO INCLUDE IS A WOODEN RULER TO MEASURE MY KNITTING.
Here's a list of the supplies I would need to make my French knit bath mitt:
* some paper. I used a composition book.
*Lily N Cream cotton yarn
*Set of 5, double pointed knitting needles (3.5 mm/ 4 US)
*Scissors
*Pen, to write with
*Row counter
*Row marker
*Yarn needle
*Needle gauge
*Wooden ruler (not pictured here - to measure knitting)
So it's always a good thing to knit a test swatch to figure out what your gauge is. How many stitches would you knit per inch. So I went to find the tail yarn on the inside of my skein. That's where the "accidental" part comes in. Some skeins of yarn just aren't put together very well. This is what happened. When I thought I'd pulled out the tail yarn, literally half the skein popped out. It took me forever to untangle everyone. This is what I had once it was all fixed:
THIS IS WHAT HAPPENS WHEN YOU DON'T FIND THAT INSIDE TAIL YARN. I ENDED UP UP PULLING OUT HALF THE SKEIN OF YARN. NO WORRIES. IT DIDN'T STOP ME FROM MY KNITTING PROJECT.
I took two of the double pointed needles to make a test swatch. I cast on 25 stitches on TWO double-pointed needles held together. That helps keep the tension when you're casting on nice and loose. No worries. It will tighten up naturally as you knit.
I just knit one row, and pearled back. That is called "stockinette stich". I ended up making a little 5 inch x 5 inch square, mainly because I was still working out some frustration from the crazy yarn ball . Then when you reach the desired length, simply bind off loosely. Or you can undo the yarn and reuse it in your knitting project. However, it turned out quite nice. It's a coaster or mug rug of sorts ;) :) The edges will curl just a bit when you knit this way. It's just the nature of the yarn to do so, even if you knit with wool. I might take an iron to it. I haven't decided yet.
Here's what my little gauge swatch turned "patriotic mug rug" looks like with a teacup sitting on top of it. I added some vintage effects to the photo. Isn't that just the cutest?
I'm working on another pattern for a coaster. It will be just as pretty, if not prettier. Plus, the way I'm knitting it, it'll lay FLAT. When it's all done, I'll write up the pattern and share it here with you all.
After the fiasco with the yarn, I decided I needed a treat. So I made a java chip coffee ice cream rootbeer float. Trust me, this works together. You will need the favorite coffee ice cream and rootbeer of your choice. You can use any flavor ice cream that you like. I just happen to LOVE coffee ice cream, especially java chip.
Choose a favorite mug or glass. Scoop out a nice, large healthy amount of ice cream into your mug. Then add your rootbeer. Now be careful when you pour, because it is a soda. The soda will foam up quite a bit. Just pour a little bit, let the foam go away, then pour some more. And enjoy a nice cold treat on a warm summer day.
Oh, my that java chip rootbeer float was GOOD!!!! Did I mention that I love coffee and coffee ice cream? big smile :) :) :)
What I meant to show you originally today was my pattern for a simple knit bath mitt. You'll need all the supplies that I mentioned at the top of this post, with the exception of the pen and paper. However, I like to take notes on each knitting project. It's like keeping a journal of sorts. It can actually be very helpful to you, if you have to stop your work or if you have questions later on about something you did.
HEATHER'S KNITTED FRENCH BATH MITT
Finished mitt should be 5 inches wide x 7 inches tall. Remember, this is knit in the ROUND...so you will actually be knitting a 10 inch continuous circle.
Also, this is just general instructions. you can manipulate this pattern any way you'd like to. Also, depending on what needles you use and your knitting style, your gauge might be different. There's no right or wrong with this pattern. That's what's really great about it.
So this is how I made mine. After I knit that gauge swatch turned coaster...I took a wooden ruler and measured the stitches per inch. It came out to approximately 5 stitches per inch. So since I"m knitting in the round a 10 inch circle, I multipled 5 stitches per inch times the 10 inch circle and came up with 50 stitches total.
Here's where there's some more wiggle room. I wanted an even number of stitches on each of my four knitting needles, so I rounded DOWN to 48 stitches. That would give me 12 stitches per needle. Also, I LOVE to use 5 double pointed knitting needles when knitting in the round. I have the yarn project sperad out over four knitting needles, and I"m always knitting in with the fifth needle. This is less stress on the yarn when k nitting in the round. you get a much smoother finish than you do when just using 4 needles.
Okay, so hold two double-pointed needles together and cast on a total of 48 stitches. Remove just ONE of the double pointed needles and begin to knit evenly in the round. I placed 12 stitches on each needle. Don't worry if there a little gap when you first join the ends together. It will tighten up a s you knit. Plus you can use th e tail yarn to weave together any loose spots at the end of your project.
Make sure to have a row marker at the beginning of your row, so you know where the end and beginning of your rows are. In this case, since I'm using double-pointed knitting needles, I placed the row marker one stich in from the beginning of the row. This prevents the row marker from falling off as your knitting :)
Just continue to knit in the round for a total of 58 rows OR until the piece measures 7 inches long. I forgot to write down how many rows I actually knit when I was finished. However, 58 rows sounds about right. Then do a combination of knitting the stitches together/binding off loosely. Weave in the loose ends on the wrong side of the project. This is what my project looks like, with some vintage touches added to it.
If you want or need more detailed instructions, let me know. I will also be doing another post on my French bath mitts sometime in the near future, with clearer instructions. However, this pattern is fairly simple and straight forward. Again, if you have any questions whatsoever, please let me know. I'll do my best to answer them. I like this project for it's versatility. It makes a great bath mitt to use in the shower or bathtub. you can even put a bar of soap inside, and it's a soaper/scrubber all in one ;) :) OR you can use it to help with washing dishes. It makes a hand dish mitt, too :) :)
Today in my devotions I was reading through Leviticus where God is telling Moses and the people about keeping certain days as well as specific rituals to be maintained in the Temple. Now, it was a LOT of detail. So glad that I live under grace now, because all of that detail would be a bit overwhelming for me :) :) That was Leviticus chapters 23 and 24.
Then I read Psalm 24. These verses stood out to me. Right now I'm highlighting ALL verses in the Bible that have to do with the tongue, whether it be about lying, deceit, gossip, anything that talks about our speach and what we should or shouldn't be doing. So these verses stood out to me today:
3) Who may ascend into the hill of the Lord? Or who may stand in His holy place?
4) He who has clean hands and a pure heart, Who has not lifted up his soul to an idol, Nor sworn deceitfully.
5) He shall receive blessing from the Lord, And righteousness from the God of his salvation.
Now, we know that our salvation is based on accepting Jesus Christ as our LORD and Savior. He is the one who cleanses us from sin :) :) What stood to me here, is that even in the Old Testament, God makes it very CLEAR that He does not deceit. Swearing deceitfully is the same as lying. So that'll be added to my list of verse that refer to the "tongue". I'm also writing down all verses that refer to money, because I want to know what God has to say about that, too.
My final passage for today was Acts 21. The short version is that Paul is chilling with some fellow believers. He goes to Jerusalem. They don't want him to go. A man prophecies that he (Paul) will be bound in Jerusalem and delivered to the Gentiles. Paul "No problem, I'm going to go anyway and preach the Gospel" (that's my interpretation" :) :) Paul loves Jesus, more than his own life. I'm not sure I'm that strong ,to be honest.
Anyways, that's where I'm at in my Bible reading today. I'm going to try and journal some more of that with you on Wednesdays. So bear with me, if I sound like I'm stumbling over my own words a bit. Paul did, too, right?
Well, thanks for joinging me today. I love it when you stop by and visit me. You are all welcome here :) :) Oh, Dairy Queen here in Oregon is having a sale on their 4-piece chicken strip baskets. Only $3.99...holla...Dad and I are SO going to enjoy that today. That's the news from Oregon today. Extra love and hugs, Heather :)
Labels:
Bible study,
Building Our Homes Together,
knitting,
recipes
Thursday, June 2, 2011
MY FIRST "BUILDING OUR HOMES TOGETHER" POST FOR JUNE 2ND

I AM PARTICIPATING IN THE "BUIDING OUR HOMES TOGETHER" SERIES OVER AT PRAIRIE FLOWER FARM. THIS WILL BE A SERIES THAT I WILL BE PARTICIPATING IN EVERY WEDNESDAY .
Hi everyone :) :) :) How has your week been going so far? Mine has been really good. It has also been really quiet. Okay, so this is really cool. My friend Linda over at Prairie Flower Farm is starting a new Wednesday series called "Building Our Homes Together". Click on the link to visit the page and find out more details.
My dream is for my home to be such a haven of hospitality, that anyone who comes through the door will be feel encouraged, joy, happiness. I would love for people to feel encouragement, love and joy when they leave my home. Also, I would love for that joy to be carried to wherever they may call home :) :) My foundation is reading my Bible every day. I also am working on the practical part of taking the time/effort to brighten up the place in which I live.
Here is my entry for today. One of my goals in keeping a "home" is making all my meals at home. Now, I live in an apartment. However, any residence can feel like a castle, if you take the time to make it so. Today I made another batch of "avocado ice cream". Yes, I said AVOCADO :) :) :) You can find the recipe on page 14 of the June/July issue of "Mary Jane's Farm" magazine.
"AVOCADO ICE CREAM"
Add the following ingredients:
ADD ONE LARGE AVOCADO, PEELED AND DICED.
NOTE: I used two small Hass avocadoes. The avocadoes available in the grocery store are not very big. They are small, in my opinion. So I just used two "small" avocadoes. It worked out nicely. Make sure the avocadoes are soft before you dice them. It makes all the difference, especially when you begin to puree the avocado.
NEXT ADD ONE CUP OF HALF AND HALF.
I used a mason jar, since it had the half-cup increments marked on the side of the jar. My glass measuring cup was used later for the lemon juice.
ALSO ADD TWO-THIRDS CUP (2/3 CUP) OF POWDERED SUGAR.
The recipe calls for powdered sugar. That is what I used. The measuring cup in the photo is a 1/3 cup. You'll need two of those to equal 2/3 cup of powdered sugar. You can probably use agave syrup or honey instead. However, you'll need to adjust the ratio accordingly. I'm not sure how to adjust that. You'll need to look that up on-line. If I find something, I'll update my post :)
ALSO ADD 1/3 CUP OF FRESH-SQUEEZED LEMON JUICE AND 1/2 TEASPOON OF LEMON ZEST.
I don't have measuring spoons, so I use a coffee spoon for a teaspoon. That is the one you see pictured in the photo. A soup spoon works well as a tablespoon. In this case, for the lemon zest, I used the peel from an ORGANIC lemon for the zest and the juice. It's really up to you, what you feel like using :) :)
AFTER YOU HAVE ADDED THE AVOCADO, HALF AND HALF, POWDERED SUGAR, LEMON ZEST AND LEMON JUICE, PUREE EVERYTHING IN A FOOD PROCESSOR UNTIL SMOOTH.
I purchased a mini food processor at a yardsale for $2. I was so excited to use it for the first time. It turned out to be a dud. Maybe I couldn't figure it out? Nope. I plugged it into the outlet and nada. My sweet dad came to the rescue. He suggested I use the hand-held mixer. Let me tell you something. It worked FABULOUS :) :) We actually "fought" over who would get to "mix/puree" the avocado mixture. It was so much fun, worked great, and only cost us a little bit of time :) :) The avocado pureed wonderfully with all the other ingredients.
ONCE ALL THE INGREDIENTS HAVE BEEN PUREED/MIXED TOGETHER, POUR INTO A CONTAINER. PLACE A TIGHT-FITTING LID ON TOP. PLACE IN THE FREEZER FOR FOUR HOURS OR UNTIL SET. WHEN YOU ARE READY TO EAT IT, LET IT SIT AT ROOM TEMPERATURE FOR 15 MINUTES BEFORE SERVING.
Okay, this is great. Since the avocado was much softer this time, it pureed so easily. Also notice that it is actually a bit greener than the last batch that I made. Now the last time I made this, I had to let the ice cream sit in the freezer overnight for it to fully set. The actual time needed to set will vary , depending on the type of freezer that you have in your home. I will let mine sit in the freezer overnight.
THIS IS THE FINISHED PRODUCT - SUPER DELICIOUS AVOCADO ICE CREAM. I EVEN PICKED A REALLY NICE DESSERT DISH AND PLATE WITH PINK FLOWERS AND GREEN LEAVES. DO YOU NOTICE THAT THE GREEN LEAVES ON THE CHINA MATCHES THE COLOR OF THE ICE CREAM? THAT IS BEAUTIFUL.
I let the ice cream sit at room temperature for 15 minutes before I served it. Next time, I'll let it sit a bit longer. My soup spoon served as an ice cream scooper today. Oh, the ice cream tasted DIVINE. It tasted so heavenly. The hand-held mixer really made a difference in the texture and the color. The avocado ice cream came out greener than my first batch.
If you try making this ice cream, let me know and maybe leave a link to your blog, so that I can see it :) :) I had some ice cream after lunch :) :) Yum. Yum. It will be necessary to have a little more after dinner, too.
This is what's on my mind today :) :) I'm also participating in Rhonda's "On my mind.." series over at Down to Earth. Check it out. There are so many lovely blogs to visit and inspiration to be found ;) :)
That's the news from Oregon today. Love and hugs, Heather :)
Labels:
avocadoes,
blogs I love/read,
home keeping,
recipes
Tuesday, May 24, 2011
MR. KITTY COMES FOR TEA
Hi everyone,
How is your week going so far? Mine has gone really well so far.
My sweet friend over at Red Pine Mountain sent me these latte bowls. She had them up as a giveaway. Not that many people entered. Too bad for them, but very happy lucky for me :) :) These bowls are from a company called Anthropologie. Aren't they just the cutest? Plus, they are very vintage chic.
THE GREEN LATTE BOWL WITH ALL MY OTHER TREASURES, EVEN MY STUFFED PINK CAT NAMED MR. KITTY :) :)
I decided to have coffee today. I made my own version of a "Depression" (as in Depression Era) mocha latte coffee. My little stuffed pink cat, Mr. Kitty, decided he wanted to drop by for some tea, too :) :)
If you remember, Mr. Kitty is the stuffed pink kitty cat that I made when I was just a mere five years old. I cut out the fabric, decorated it, stuffed it, sewed it together. Mr. Kitty and I go way back :) :) He's my precious toy from childhood. His eyes look a bit strange, like they burn with the fires of Mordor (remember the movies Lord of the Rings? )...but I was only five years old :) :) Anyways, I think Mr. Kitty fits in just nicely with everything today :) :)
My sewing box always looks like that, too. It seems like I can't make up my mind what to do with it. So I pile it with memories that make me smile :) :) Gifts, treasures, antiques.....:)
THIS IS MY CHACULT CHINA TEACUP WITH MATCHING SAUCER. IF YOU LOOK REALLY CAREFULLY, YOU 'LL NOTICE THE PALE GREEN LEAVES MATCH PERFECTLY WITH THE GREEN LATTE BOWL.
Mr. Kitty loves to be color coordinated with his tea things, so he chose the pink floral teacup today. I think it is a really nice compliment to the green latte bowl, too.
THIS IS ACTUALLY WHERE I ENJOYED MY "DEPRESSION ERA" MOCHA THIS MORNING. THE PINK FLORAL FABRIC IN THE BACKGROUND IS ACTUALLY A BAG THAT I USE WHEN I'M GROCERY SHOPPING AT THE STORE OR THE FARMER'S MARKET.
Normally, I would sit at the table. However, my table is FULL of craft stuff and other things. So I sat in my dad's recliner and set the mocha on my wooden bench. It was great :) :) I watched a little bit of tv while enjoying my coffee. I'll post the "recipe" at the end of this post today :) It's really easy. It was just a matter of using what I already had in the kitchen :)
THE COFFEE TIN AND THE GREEN HOT PAD WERE FOUND AT A GARAGE SALE RECENTLY. THE COFFEE TIN WAS JUST $0.25 CENTS. THE HOTPAD WAS FREE. THAT IS THE BEST KIND OF DEAL.
I have to watch my money, which means I cannot shop at yardsales/garage sales as often as I would like to. However, I had to purchase that little coffee tin because it was only a quarter . I thought it would make a cute container for sewing supplies. What do you think? What would you use it for?
The hot pad is great. I like this style in particular, because it's like a mitt without covering up your whole hand. I have another one like it that has a coffee theme on it. The green hotpad has a picture of a barn. In one of my magazines, there's a project that takes hotpads like this and extra fabric. You use the extra fabric to cover the hotpad. So you make it prettier, more vintage chic AND you have recycled an item all at the same time :) :)
You can also see some of my Gooseberry Patch cookbooks and a glass latch/hook jar. I've been using a lot of recipes out of those cookbooks lately. So they are always nearby. The glass jar was purchased at my church's yard sale for $1. I love jars like this and Mason jars, too. I LOVE Mason jars. So this will make a really pretty storage container for something really cute someday :) :)
MY RECIPE FOR DEPRESSION ERA MOCHA LATTE COFFEE:
*1 packet of instant coffee
*1 packet of cocoa mix
*some milk, however much you like
*boiling water
* sugar - to taste
Set some water to boil. While that is coming to boil, mix all the other ingredients together in a nice latte bowl ( or cup). The order of ingredients doesn't matter, since it's all going to mix with the boiling water, anyway :)
Once the water has come to a boil, turn off the heat. Add boiling water and stir until everything is well blended.
Make sure to drink this in a really cute latte bowl or mug. It's a guarantee that it will taste better :) :) In any case, this tasted really, really good :) :) I added just a bit of granulated white sugar to help sweeten it up a bit. It turned out surprisingly well. It was really cheap, too, because I just had to buy the milk. Everything else I already had at home :) :)
I'd love to hear some of your "Depression Era" tips and recipes. Most of us have relatives who lived through the Great Depression of the 1930s. Economic times were tough here in the States and around the world. I know it's not that bad now, however, it's important to be wise with what we've been given . So I made up this recipe , because it was cheap and met a need. In this case, my need for a good cup of coffee :) :) :)
Oh, welcome to all the new followers. I definitely notice all of you. Welcome, welcome to my blog ;) :) You make my heart very happy. Feel free to sit a spell and visit ;) :)
One last thing, you have probably heard about the devastating tornadoes in Joplin, Missouri. The town has been virtually decimated/wiped out...even important facilities like hospitals and fire stations. Please pray for the people there. Pray for the weather. It's a difficult time for them right now. There are so many prayer needs. Right now pray for the people who are on the ground doing the daily task of trying to help the people there. There's so much to be done. They really need our prayers and support!! It is a difficult thing to see the images on the news. It's a very insecure world that we live in. However, God is the one sure thing in a world of uncertainties. In the midst of all this, there is hope we can cling too :) :) Thanks, folks :) :)
That's the news from Oregon today. Love and hugs, Heather :)
How is your week going so far? Mine has gone really well so far.
My sweet friend over at Red Pine Mountain sent me these latte bowls. She had them up as a giveaway. Not that many people entered. Too bad for them, but very happy lucky for me :) :) These bowls are from a company called Anthropologie. Aren't they just the cutest? Plus, they are very vintage chic.
THE GREEN LATTE BOWL WITH ALL MY OTHER TREASURES, EVEN MY STUFFED PINK CAT NAMED MR. KITTY :) :)
I decided to have coffee today. I made my own version of a "Depression" (as in Depression Era) mocha latte coffee. My little stuffed pink cat, Mr. Kitty, decided he wanted to drop by for some tea, too :) :)
If you remember, Mr. Kitty is the stuffed pink kitty cat that I made when I was just a mere five years old. I cut out the fabric, decorated it, stuffed it, sewed it together. Mr. Kitty and I go way back :) :) He's my precious toy from childhood. His eyes look a bit strange, like they burn with the fires of Mordor (remember the movies Lord of the Rings? )...but I was only five years old :) :) Anyways, I think Mr. Kitty fits in just nicely with everything today :) :)
My sewing box always looks like that, too. It seems like I can't make up my mind what to do with it. So I pile it with memories that make me smile :) :) Gifts, treasures, antiques.....:)
THIS IS MY CHACULT CHINA TEACUP WITH MATCHING SAUCER. IF YOU LOOK REALLY CAREFULLY, YOU 'LL NOTICE THE PALE GREEN LEAVES MATCH PERFECTLY WITH THE GREEN LATTE BOWL.
Mr. Kitty loves to be color coordinated with his tea things, so he chose the pink floral teacup today. I think it is a really nice compliment to the green latte bowl, too.
THIS IS ACTUALLY WHERE I ENJOYED MY "DEPRESSION ERA" MOCHA THIS MORNING. THE PINK FLORAL FABRIC IN THE BACKGROUND IS ACTUALLY A BAG THAT I USE WHEN I'M GROCERY SHOPPING AT THE STORE OR THE FARMER'S MARKET.
Normally, I would sit at the table. However, my table is FULL of craft stuff and other things. So I sat in my dad's recliner and set the mocha on my wooden bench. It was great :) :) I watched a little bit of tv while enjoying my coffee. I'll post the "recipe" at the end of this post today :) It's really easy. It was just a matter of using what I already had in the kitchen :)
THE COFFEE TIN AND THE GREEN HOT PAD WERE FOUND AT A GARAGE SALE RECENTLY. THE COFFEE TIN WAS JUST $0.25 CENTS. THE HOTPAD WAS FREE. THAT IS THE BEST KIND OF DEAL.
I have to watch my money, which means I cannot shop at yardsales/garage sales as often as I would like to. However, I had to purchase that little coffee tin because it was only a quarter . I thought it would make a cute container for sewing supplies. What do you think? What would you use it for?
The hot pad is great. I like this style in particular, because it's like a mitt without covering up your whole hand. I have another one like it that has a coffee theme on it. The green hotpad has a picture of a barn. In one of my magazines, there's a project that takes hotpads like this and extra fabric. You use the extra fabric to cover the hotpad. So you make it prettier, more vintage chic AND you have recycled an item all at the same time :) :)
You can also see some of my Gooseberry Patch cookbooks and a glass latch/hook jar. I've been using a lot of recipes out of those cookbooks lately. So they are always nearby. The glass jar was purchased at my church's yard sale for $1. I love jars like this and Mason jars, too. I LOVE Mason jars. So this will make a really pretty storage container for something really cute someday :) :)
MY RECIPE FOR DEPRESSION ERA MOCHA LATTE COFFEE:
*1 packet of instant coffee
*1 packet of cocoa mix
*some milk, however much you like
*boiling water
* sugar - to taste
Set some water to boil. While that is coming to boil, mix all the other ingredients together in a nice latte bowl ( or cup). The order of ingredients doesn't matter, since it's all going to mix with the boiling water, anyway :)
Once the water has come to a boil, turn off the heat. Add boiling water and stir until everything is well blended.
Make sure to drink this in a really cute latte bowl or mug. It's a guarantee that it will taste better :) :) In any case, this tasted really, really good :) :) I added just a bit of granulated white sugar to help sweeten it up a bit. It turned out surprisingly well. It was really cheap, too, because I just had to buy the milk. Everything else I already had at home :) :)
I'd love to hear some of your "Depression Era" tips and recipes. Most of us have relatives who lived through the Great Depression of the 1930s. Economic times were tough here in the States and around the world. I know it's not that bad now, however, it's important to be wise with what we've been given . So I made up this recipe , because it was cheap and met a need. In this case, my need for a good cup of coffee :) :) :)
Oh, welcome to all the new followers. I definitely notice all of you. Welcome, welcome to my blog ;) :) You make my heart very happy. Feel free to sit a spell and visit ;) :)
One last thing, you have probably heard about the devastating tornadoes in Joplin, Missouri. The town has been virtually decimated/wiped out...even important facilities like hospitals and fire stations. Please pray for the people there. Pray for the weather. It's a difficult time for them right now. There are so many prayer needs. Right now pray for the people who are on the ground doing the daily task of trying to help the people there. There's so much to be done. They really need our prayers and support!! It is a difficult thing to see the images on the news. It's a very insecure world that we live in. However, God is the one sure thing in a world of uncertainties. In the midst of all this, there is hope we can cling too :) :) Thanks, folks :) :)
That's the news from Oregon today. Love and hugs, Heather :)
Labels:
blogs I love/read,
gifts,
prayer,
recipes,
tea
Wednesday, May 18, 2011
AVOCADO ICE CREAM
Hi everyone, I seem to be on an experimental-cooking frenzy lately. That's okay. It is been well worth it, and very tasty too. As many of you many know, I subscribe to MaryJane's Farm magazine. This magazine, and all other things related to MaryJane's Farm is lots of fun. I'm even a member of the Farmgirl Sisterhood. My member number is #2176 to be exact. In any case, the June/July issue of MaryJanesFarm magazine arrived in my mailbox a few days ago. A I was "oohing and ahing" over all the great recipes, craft projects etc, I stumbled upon this fabulous recipe. It's for avocado ice cream. yes, you heard me right, avocado ice cream. I've never eaten avocadoes before, so this was something I absolutely had to try. Mine turned out like this:
THIS IS MY VERY FIRST BATCH OF AVOCADO ICE CREAM. I DIDN'T HAVE A FOOD PROCESSOR. SO I HAD TO TRY AND PUREE IT MY HAND USING A FORK AND A POTATO MASHER. IT DIDN'T WORK OUT TERRIBLY WELL. MY ICE CREAM WAS MORE LIKE AVOCADO CHIP. HOWEVER, IN SPITE OF THAT, IT STILL TASTED VERY, VERY HEAVENLY .
Here is the recipe, if you'd like to try it for yourself. It tastes like the best lemon ice cream, even though it has avocado in it. You do not taste the avocado at all. It makes about three cups of ice cream:
Ingredients:
* 1 large avocado, peeled and diced
* 1 cup half-and-half
* 2/3 cup powdered sugar
*1/2 teaspoon lemon zest
* 1/3 cup fresh lemon juice
First, combine ALL the ingredients in a blender. Puree until it is completely smooth.
Second, pour the mixture into a 2-quart baking dish.
Third, cover and freeze it till firm, about four hours. (my freezer it took much longer than that, so you may have to freeze it overnight)
Fourth, before serving, let stand at room te mperature for 15 minutes. Use an ice-cream or watermelon scoop to serve. The magazine suggests topping it with fresh fruit or mango salsa.
That's the news from Oregon today. Love and hugs, Heather :)
THIS IS MY VERY FIRST BATCH OF AVOCADO ICE CREAM. I DIDN'T HAVE A FOOD PROCESSOR. SO I HAD TO TRY AND PUREE IT MY HAND USING A FORK AND A POTATO MASHER. IT DIDN'T WORK OUT TERRIBLY WELL. MY ICE CREAM WAS MORE LIKE AVOCADO CHIP. HOWEVER, IN SPITE OF THAT, IT STILL TASTED VERY, VERY HEAVENLY .
Here is the recipe, if you'd like to try it for yourself. It tastes like the best lemon ice cream, even though it has avocado in it. You do not taste the avocado at all. It makes about three cups of ice cream:
Ingredients:
* 1 large avocado, peeled and diced
* 1 cup half-and-half
* 2/3 cup powdered sugar
*1/2 teaspoon lemon zest
* 1/3 cup fresh lemon juice
First, combine ALL the ingredients in a blender. Puree until it is completely smooth.
Second, pour the mixture into a 2-quart baking dish.
Third, cover and freeze it till firm, about four hours. (my freezer it took much longer than that, so you may have to freeze it overnight)
Fourth, before serving, let stand at room te mperature for 15 minutes. Use an ice-cream or watermelon scoop to serve. The magazine suggests topping it with fresh fruit or mango salsa.
That's the news from Oregon today. Love and hugs, Heather :)
Labels:
avocadoes,
ice cream,
MaryJanesFarm magazine,
recipes
Monday, May 16, 2011
"MOM'S MILD CHILI" FROM GOOSEBERRY PATCH
Hi everyone,
Oh, goodness, I'm really loving my Gooseberry Patch cookbook "Dinner$ on a Dime". It's just packed FULL of economical and super tasty recipes. Here's another one that I made the other day.
THIS IS THE RECIPE FOR "MOM'S MILD CHILI" SUBMITTED BY JOYCE ROSSBACH OF TROY, MI.
YOU CAN FIND THIS IN THE GOOSEBERRY PATCH COOKBOOK "DINNER$ ON A DIME".
I love chili. I mean, I really love to eat chili. It's just plain good comfort food. As far as I'm concerned, it's also very good for you. So when I saw this recipe, I knew I had to try it. It's easy :) :) Here's the recipe:
Ingredients:
* 1 lb. ground beef chuck
* 1 Tbsp. dried, minced onion
*10-3/4 oz. can tomato soup
* 2/3 cup water
* 16 oz . can red beans
* 1- 1/4 oz. pkg. mild chili seasoning mix
In a skillet over medium heat, brown the beef with the onion; drain.
Stire in remaining ingredients; reduce heat to low.
Simmer for 30 minutes, stirring occasionally.
Make 4 servings
HEATHER THE WEATHER'S NOTES ON COOKING IN THE KITCHEN:
This recipe is a hands-down WINNER :) :) :) This is just exactly how chili should taste --- absolutely yummy :) :)
I did make some changes, because I'm making economical and tasty recipes while using up what I have already in the kitchen. I didn't have minced onion. However, there was a nice little jar of onion powder in my pantry. So that's what I used instead of the minced onion.
Also, I added some sugar to the recipe to counteract the sometimes sharp taste of tomatoes. It's actually a tip at the bottom of the recipe. So it's worth your money to buy the cookbook. I'm the kind of girl who likes her chili spicy, but also with a little bit of sweet. It turned out so GOOD.
I'm making this again tonight. My father and I were at the grocery store earlier this morning. We got a one pound chub of ground beef for just $1.99 a pound. That's a steal of a deal, for sure. So I've had a hankering for this chili ever since the last time I made it ;) :) :)
I also added some nacho blend cheese mix, because I do love cheese, too. Now to figure out how to make a giant pot of this chili :) :) :)
Thank you so much to Gooseberry Patch for letting me share this recipe. I was not paid for this review. I am happily sharing products and companies that I LOVE with you :) :) This is a company that combines cuteness/beauty with the very practical need for good things to cook and eat :) :)
Oh, there are lots of prayer requests. If you could pray for a family at my church. The husband, our church's worship leader, had back surgery today. Pray that everything goes well and he can make a full, complete, and speedy recovery. He has a lovely wife and two super cute kids :) :) :) Pray for lots of things including that God will meet and exceed all the needs that will come up for this family, practical and otherwise. :) :) :)
That's the news from Oregon today . Love and hugs, Heather
Oh, goodness, I'm really loving my Gooseberry Patch cookbook "Dinner$ on a Dime". It's just packed FULL of economical and super tasty recipes. Here's another one that I made the other day.
THIS IS THE RECIPE FOR "MOM'S MILD CHILI" SUBMITTED BY JOYCE ROSSBACH OF TROY, MI.
YOU CAN FIND THIS IN THE GOOSEBERRY PATCH COOKBOOK "DINNER$ ON A DIME".
I love chili. I mean, I really love to eat chili. It's just plain good comfort food. As far as I'm concerned, it's also very good for you. So when I saw this recipe, I knew I had to try it. It's easy :) :) Here's the recipe:
Ingredients:
* 1 lb. ground beef chuck
* 1 Tbsp. dried, minced onion
*10-3/4 oz. can tomato soup
* 2/3 cup water
* 16 oz . can red beans
* 1- 1/4 oz. pkg. mild chili seasoning mix
In a skillet over medium heat, brown the beef with the onion; drain.
Stire in remaining ingredients; reduce heat to low.
Simmer for 30 minutes, stirring occasionally.
Make 4 servings
HEATHER THE WEATHER'S NOTES ON COOKING IN THE KITCHEN:
This recipe is a hands-down WINNER :) :) :) This is just exactly how chili should taste --- absolutely yummy :) :)
I did make some changes, because I'm making economical and tasty recipes while using up what I have already in the kitchen. I didn't have minced onion. However, there was a nice little jar of onion powder in my pantry. So that's what I used instead of the minced onion.
Also, I added some sugar to the recipe to counteract the sometimes sharp taste of tomatoes. It's actually a tip at the bottom of the recipe. So it's worth your money to buy the cookbook. I'm the kind of girl who likes her chili spicy, but also with a little bit of sweet. It turned out so GOOD.
I'm making this again tonight. My father and I were at the grocery store earlier this morning. We got a one pound chub of ground beef for just $1.99 a pound. That's a steal of a deal, for sure. So I've had a hankering for this chili ever since the last time I made it ;) :) :)
I also added some nacho blend cheese mix, because I do love cheese, too. Now to figure out how to make a giant pot of this chili :) :) :)
Thank you so much to Gooseberry Patch for letting me share this recipe. I was not paid for this review. I am happily sharing products and companies that I LOVE with you :) :) This is a company that combines cuteness/beauty with the very practical need for good things to cook and eat :) :)
Oh, there are lots of prayer requests. If you could pray for a family at my church. The husband, our church's worship leader, had back surgery today. Pray that everything goes well and he can make a full, complete, and speedy recovery. He has a lovely wife and two super cute kids :) :) :) Pray for lots of things including that God will meet and exceed all the needs that will come up for this family, practical and otherwise. :) :) :)
That's the news from Oregon today . Love and hugs, Heather
Labels:
blogs I love/read,
cookbook,
prayer,
recipes
Saturday, May 14, 2011
SPEEDY STROGANOFF & OTHER INTERESTING THINGS :) :) :)
Hi everyone,
How are you all? Did you all recover from the Blogger blackout the other day? I was starting to go through some blogging withdrawls. Everything is back up and running, so this post will be a little longer than usual.
First, here's a lovely lilac for you :) :) The smell is lovely.
THIS LILAC BUSH IS EASILY OVER 7 FEET TALL. IT LOOKS MORE LIKE A TREE, IF YOU ASK ME. WHEN IT FIRST STARTED SHOWING BLOOMS, THEY WERE A DEEP PURPLE. EVENTUALLY THEY TURNED TO THIS LOVELY PALE PURPLE COLOR.
Okay, I am just loving my Gooseberry patch cookbooks. I have three of them so far. It is a very small, but very mighty collection. The one book I've been cooking A LOT out of recently is Gooseberry Patch's cookbook "Dinner$ on a Dime". You can click here and go to their website, if you want some more info.
Oh, just so everyone knows, I am not getting paid for this. I'm happily sharing this information with you because I love this company and their product :) :) :) I paid for the cookbook myself, because I really wanted a copy :) :)
I REALLY ENJOY BEEF STROGANOFF. THIS IS THE PICTURE FROM THE THIRD TIME I MADE THIS. THE FIRST TWO TIMES, I FORGOT TO TAKE A PHOTO TILL AFTER I HAD ALREADY EATEN THE FOOD :) :) :)
My father and I are really making an effort to cook all our meals at home. Not only is it better for you, it also saves a lot of money versus eating out or buying pre -packaged foods.
This particular day I decided to make the Gooseberry Patch recipe for Speedy Stroganoff. You can find it on page 7 of the Gooseberry Patch Cookbook "Dinner$ on a Dime".
SPEEDY STROGANOFF
(submitted by Connie Ferrell of Blanchester, OH )
Ingredients:
1 lb. ground beef
1 onion, diced
2 tsp. paprika ( I left this out, since I'm not a paprika fan)
1 tsp. salt
1/2 tsp. pepper
10 3/4 oz. can cream of mushroom soup
16 oz. container of sour cream
Cooked egg noodles
In a skillet over medium heat, brown beef and onion; drain. Add paprika (in my opinion, optional :), salt and pepper, stirring thoroughly.
Reduce heat to medium-low.
Blend in the mushroom soup and heat through.
Stir in sour cream. Serve over cooke noodles.
Serves 4
MY NOTES: I did change a couple of things in the recipe based on preference and making sure to use what was on hand. I don't like paprika. I'm not a spice snob, it's just a taste that I prefer less over other spices. The stroganoff sauce works great without it, too.
Also the first time I made it, my father helped me. He forgot about the egg noodles, and he grabbed spaghetti instead. Well, it works :) :) It's pasta :) :) :) It still tasted fabulous :) :) :) The second and third time we used spiral pasta.
You could also use another ground meat, if you don't eat beef.
This recipe is really super easy and very inexpensive. The meat was the most expensive item. That I purchased on special at the store. So depending on what's on sale, that might influence what you use :) :) I highly recommend this cookbook. Next time, I'll share the easy chili recipe. Oh, goodness, I was in chili heaven :) :) :)
In other news, here are few things that I thought you might get a tickle out of:
HERE ARE SOME VINTAGE ITEMS I THOUGH YOU'D ENJOY. I AM ALWAYS FINDING SOMETHING TO FEED MY LOVE OF ALL THINGS VINTAGE CHIC.
The tin on the right is a real old-school Saltine crackers TIN. Yes, folks, you heard right, I said TIN . I found it at a yard sale for $1. It's practical and oh so cute. I'm thinking if the folks at the saltine cracker company started packaging their crackers in tins, they'd sell more crackers. My father and I are sort of "passionately discussing" who gets to keep this.
Oh, the soda bottles. Do those bring back memories. My local Fred Meyer store has an entire section of classic sodas. So my father and I bought these three. He remembers Bubble Up from his childhood. My dad's a father, so he thought "Dad's rootbeer" was cute, because it technically has "his name" on it ;) :) The one in the middle, I've never had a sarsparilla soda. So I had to try it. What are some classics that you love?
THE POSTAL SERVICE HERE IN OREGON IS HAVING A "STAMP OUT HUNGER" FOOD DRIVE TODAY. THEY ARE COLLECTING BAGS OF FOOD TO HELP FEED THE HUNGRY HERE IN OREGON. WE HAVE AN UNUSUALLY HIGH NUMBER OF HUNGRY PEOPLE.
It was really neat driving through town today, because almost everywhere I looked I saw white and yellow bags handing from mailboxes, sitting on sidewalks or on top of mailboxes. Every bag filled with non-perishable foods to help those who really need it. It really is a beautiful sight :) :) :)
HERE ARE SOME FLOWERS TO SEND YOU ON YOUR WAY TODAY. I THINK THESE ARE JUST GORGEOUS. THE PETALS HAVE RUFFLES. THIS PARTICULAR FLOWER GROWS EVERYWHERE HERE IN SOUTHERN OREGON. IT ALSO COMES IN MANY DIFFERENT COLORS.
There are so many different color varieties of this particular flower. Aren't they just gorgeous? I think I'd like to have these everywhere .
Let's see. Here are some things I want to share with you later this weekend:
*More Gooseberry Patch recipes
*a recipe for avocado ice cream (intrigued? You'll have to stay tuned for that one)
*Plus two cute little yard sale finds. One for a quarter and the other FREE.
I hope all of you have a fabulous weekend. Go visit a local farmer's market. Make a craft project or whatever else makes your heart glad :) :) That's the news from Oregon today. Extra special love and hugs, Heather :)
How are you all? Did you all recover from the Blogger blackout the other day? I was starting to go through some blogging withdrawls. Everything is back up and running, so this post will be a little longer than usual.
First, here's a lovely lilac for you :) :) The smell is lovely.
THIS LILAC BUSH IS EASILY OVER 7 FEET TALL. IT LOOKS MORE LIKE A TREE, IF YOU ASK ME. WHEN IT FIRST STARTED SHOWING BLOOMS, THEY WERE A DEEP PURPLE. EVENTUALLY THEY TURNED TO THIS LOVELY PALE PURPLE COLOR.
Okay, I am just loving my Gooseberry patch cookbooks. I have three of them so far. It is a very small, but very mighty collection. The one book I've been cooking A LOT out of recently is Gooseberry Patch's cookbook "Dinner$ on a Dime". You can click here and go to their website, if you want some more info.
Oh, just so everyone knows, I am not getting paid for this. I'm happily sharing this information with you because I love this company and their product :) :) :) I paid for the cookbook myself, because I really wanted a copy :) :)
I REALLY ENJOY BEEF STROGANOFF. THIS IS THE PICTURE FROM THE THIRD TIME I MADE THIS. THE FIRST TWO TIMES, I FORGOT TO TAKE A PHOTO TILL AFTER I HAD ALREADY EATEN THE FOOD :) :) :)
My father and I are really making an effort to cook all our meals at home. Not only is it better for you, it also saves a lot of money versus eating out or buying pre -packaged foods.
This particular day I decided to make the Gooseberry Patch recipe for Speedy Stroganoff. You can find it on page 7 of the Gooseberry Patch Cookbook "Dinner$ on a Dime".
SPEEDY STROGANOFF
(submitted by Connie Ferrell of Blanchester, OH )
Ingredients:
1 lb. ground beef
1 onion, diced
2 tsp. paprika ( I left this out, since I'm not a paprika fan)
1 tsp. salt
1/2 tsp. pepper
10 3/4 oz. can cream of mushroom soup
16 oz. container of sour cream
Cooked egg noodles
In a skillet over medium heat, brown beef and onion; drain. Add paprika (in my opinion, optional :), salt and pepper, stirring thoroughly.
Reduce heat to medium-low.
Blend in the mushroom soup and heat through.
Stir in sour cream. Serve over cooke noodles.
Serves 4
MY NOTES: I did change a couple of things in the recipe based on preference and making sure to use what was on hand. I don't like paprika. I'm not a spice snob, it's just a taste that I prefer less over other spices. The stroganoff sauce works great without it, too.
Also the first time I made it, my father helped me. He forgot about the egg noodles, and he grabbed spaghetti instead. Well, it works :) :) It's pasta :) :) :) It still tasted fabulous :) :) :) The second and third time we used spiral pasta.
You could also use another ground meat, if you don't eat beef.
This recipe is really super easy and very inexpensive. The meat was the most expensive item. That I purchased on special at the store. So depending on what's on sale, that might influence what you use :) :) I highly recommend this cookbook. Next time, I'll share the easy chili recipe. Oh, goodness, I was in chili heaven :) :) :)
In other news, here are few things that I thought you might get a tickle out of:
HERE ARE SOME VINTAGE ITEMS I THOUGH YOU'D ENJOY. I AM ALWAYS FINDING SOMETHING TO FEED MY LOVE OF ALL THINGS VINTAGE CHIC.
The tin on the right is a real old-school Saltine crackers TIN. Yes, folks, you heard right, I said TIN . I found it at a yard sale for $1. It's practical and oh so cute. I'm thinking if the folks at the saltine cracker company started packaging their crackers in tins, they'd sell more crackers. My father and I are sort of "passionately discussing" who gets to keep this.
Oh, the soda bottles. Do those bring back memories. My local Fred Meyer store has an entire section of classic sodas. So my father and I bought these three. He remembers Bubble Up from his childhood. My dad's a father, so he thought "Dad's rootbeer" was cute, because it technically has "his name" on it ;) :) The one in the middle, I've never had a sarsparilla soda. So I had to try it. What are some classics that you love?
THE POSTAL SERVICE HERE IN OREGON IS HAVING A "STAMP OUT HUNGER" FOOD DRIVE TODAY. THEY ARE COLLECTING BAGS OF FOOD TO HELP FEED THE HUNGRY HERE IN OREGON. WE HAVE AN UNUSUALLY HIGH NUMBER OF HUNGRY PEOPLE.
It was really neat driving through town today, because almost everywhere I looked I saw white and yellow bags handing from mailboxes, sitting on sidewalks or on top of mailboxes. Every bag filled with non-perishable foods to help those who really need it. It really is a beautiful sight :) :) :)
HERE ARE SOME FLOWERS TO SEND YOU ON YOUR WAY TODAY. I THINK THESE ARE JUST GORGEOUS. THE PETALS HAVE RUFFLES. THIS PARTICULAR FLOWER GROWS EVERYWHERE HERE IN SOUTHERN OREGON. IT ALSO COMES IN MANY DIFFERENT COLORS.
There are so many different color varieties of this particular flower. Aren't they just gorgeous? I think I'd like to have these everywhere .
Let's see. Here are some things I want to share with you later this weekend:
*More Gooseberry Patch recipes
*a recipe for avocado ice cream (intrigued? You'll have to stay tuned for that one)
*Plus two cute little yard sale finds. One for a quarter and the other FREE.
I hope all of you have a fabulous weekend. Go visit a local farmer's market. Make a craft project or whatever else makes your heart glad :) :) That's the news from Oregon today. Extra special love and hugs, Heather :)
Wednesday, May 4, 2011
CREPES ARE MY NEW FAVORITE TASTY AND CHEAP EAT !!!
Hi everyone,
Okay, so I finally made it back into the kitchen to make crepes. I got the recipe out of the Fred Meyer "Naturally Preferred" magazine. It's a free publication that is located in the natural foods section of my Fred Meyer store. It comes out once a month. It's chock full of healthy information etc. So I really enjoy this little freebie. Plus, when I scanned the pages and saw the crepe recipe, I knew I had to make some. The recipe was changed just slightly because I only wanted to use what I had on hand. Here's how it went.
FIRST ADD A 1/2 (HALF) CUP OF ALL-PURPOSE FLOWER.
I still had a nearly full bag of Bob's Red Mill flour, so I used that. You can tell from the photo what type of flower I used. I personally don't think it matters in this case. Although, it's literally been YEARS since I made crepes. If you make them often, please feel free to share your tips for yummy crepes.
NEXT, ADD 1/2 (HALF) TEASPOON OF GROUND NUTMEG.
Why nutmeg? That is a total mystery to me. I will say it added a very nice subtle spicy note to the crepes. So feel free to include it or leave it out. I'm sure there's some sort of health benefit to nutmeg :)
Also, I used a literal "tea spoon" to measure out the nutmeg and the salt. I don't have measuring spoons, so I had to eyeball it. It's more fun that way, anyway. Besides, if it worked for the pioneers, than it will work for me, too :) :) :)
ALSO ADD 1/4 (ONE QUARTER) TEASPOON OF SALT.
Sea salt is what I had on hand. I don't even remember why I bought this particular brand. It was probably the best value when I was at the grocery store. Sea salt is "saltier" then regular salt? That's how it is, right? In any case, I personally love sea salt :) :)
Okay, so now that you have those first three inredients, mix them together in a medium-size bowl. I didn't post a photo of that because it didn't look very interesting. Once you've mixed those three ingredients in a bowl, grab another bowl and add these two items together:
IN ANOTHER SMALL BOWL, MIX TOGETHER 1 CUP OF MILK AND TWO LARGE EGGS.
Now in the original recipe it called for fat-free milk. NOPE!!! I like whole milk. Or as we now call it in my home "chubby milk". Again, I think it's a matter of preference. However, I do think everything tastes better with chubby milk :) :)
Also, the eggs should be "lightly beaten". I'm not exactly sure what that means. It just means don't mix those eggs, like you're in a race to the finish line.
GRADUALLY STIR IN THE EGG & MILK INTO THE FLOUR MIXTURE UNTIL YOU ACHIEVE "BATTER" :) :) IT SHOULD LOOK SOMETHING LIKE THIS.
I didn't think to use a different color bowl. So it's hard to see what the batter really looks like. Those darker bits are the nutmeg. The batter should be a bit runny. It will make great crepes.
The recipe said to let the batter sit for 15 minutes. Although, you could let it sit longer. I had a recipe given to me by a real Frenchman years ago. In that recipe, it said to let the mix sit for 2 hours. That's really up to you. Oh, I can't find that recipe, so that's another reason why I tried this one today.
I didn't have a non-stick skillet. Since I'm using what I have on a hand, my yardsale steel frying pan would have to work. So that's what I used. I turned the heat to a hair below medium, to give the pan a chance to warm up without overheating or burning what I was about to cook :)
I USED JUST ENOUGH COCONUT OIL TO COAT THE SURFACE OF THE PAN.
Coconut oil is great to cook with. In addition to smelling really good in the jar, it burns very CLEAN in the pan. It doesn't brown, so it's perfect for cooking on medium heat. There are a lot of benefits to using coconut oil. So I've read, anyway. I'll try and post a really nice article I found about that later this week. Coconut oil is expensive. However, you only need a minimal amount. So that's what I went with. Besides that, butter is spendy and I have to save that for other recipes :) :) I didn't use a spray because I didn't feel comfortable doing that near a hot stove.
So I added a little bit of coconut oil before adding about 1/4 cup of crepe batter. I repeated that process for every crepe. Also note, that when I did that, I removed the pan from the heat. There's no reason in particular for doing that. It's just what I felt should be done :)
Oh, how did the crepes turn out? Really yummy. The first crepe turned out really ugly and three -dimensional:
THE FIRST CREPE WAS NOT PRETTY. HOWEVER, THE TASTE WAS NOT AFFECTED ONE TINY BIT. IT STILL TASTED DELICIOUS.
This is one that I made using the coconut oil to grease the pan. Oh, next time I'm going to add oil to the recipe itself. I think that will be easier and use less oil. What do you think? Also, my crepes turned out browner than what I remember. However, I think that was due to the fact that I was using a steel skillet. What has been your experience using different cooking utensils?
After you add the coconut oil to the pan, add about 1/4 cup of crepe batter. Let it cook and set for about 1 and a half minutes. Flip it over and let it cook on the other side for about 25 seconds. This worked great. Although, even here, you can alter that according to your needs. You'll know, after a few, when it's set and ready to be turned over.
THESE WERE ALL OF MY CREPES, MINUS THE UGLY FIRST CREPE. THIS RECIPE MADE 7 CREPES FOR ME.
I did switch to butter for the last half of the crepes. It didn't make one bit of difference, other than a slightly saltier taste.
Those are my crepes. They turned out great. You can fill them with sweet or savory fillings. Today my dad and I ate them plain. They were so good. Next time, I'll make a bigger batch. It would be nice to have some for the freezer.
Here's the original recipe as it appeared in the Fred Meyer "Naturally Preferred" magazine for May 2011.
CREPES
(from Weight Watchers New Complete Cookbook - Wiley, 2011)
Ingredients
1/2 cup all-purpose flour
1/2 tsp ground nutmeg
1/4 tsp salt
1 cup fat-free milk
2 large eggs, lightly beaten
1. Whisk together flour, nu tmeg, and salt in a medium bowl. Beat together m ilk and eggs in a small bowl. Whisk m ilk misture into flour misture until smooth. Let stand 15 minutes.
2. Spray an 8-inch nonstick skillet with nonstick spray and set over medium heat until a drop of water sizzles in pan. re-stir batter: pour scant 1/4 cup of batter into skillet, tiltingh pan to coat bottom completely. Cook until top is set and underside is golden brown, about 1 1/2 minutes.
3. With spatula, loosen edge of crepe and turn over. Cook until second s ide is loightly browned, about 25 seconds. Slide crepe onto plate. Repeat with remaining batter, lightly spraying skillet before adding more batter, making a total of 8 crepes.
So there's that particular recipe. I'll definitely be making more crepes later this week, and trying a different recipe. They were so good...and I only wish I'd made more, because now I'm dependent on crepes :) :)
That's the news from Oregon today. Love and hugs, Heather :)
Okay, so I finally made it back into the kitchen to make crepes. I got the recipe out of the Fred Meyer "Naturally Preferred" magazine. It's a free publication that is located in the natural foods section of my Fred Meyer store. It comes out once a month. It's chock full of healthy information etc. So I really enjoy this little freebie. Plus, when I scanned the pages and saw the crepe recipe, I knew I had to make some. The recipe was changed just slightly because I only wanted to use what I had on hand. Here's how it went.
FIRST ADD A 1/2 (HALF) CUP OF ALL-PURPOSE FLOWER.
I still had a nearly full bag of Bob's Red Mill flour, so I used that. You can tell from the photo what type of flower I used. I personally don't think it matters in this case. Although, it's literally been YEARS since I made crepes. If you make them often, please feel free to share your tips for yummy crepes.
NEXT, ADD 1/2 (HALF) TEASPOON OF GROUND NUTMEG.
Why nutmeg? That is a total mystery to me. I will say it added a very nice subtle spicy note to the crepes. So feel free to include it or leave it out. I'm sure there's some sort of health benefit to nutmeg :)
Also, I used a literal "tea spoon" to measure out the nutmeg and the salt. I don't have measuring spoons, so I had to eyeball it. It's more fun that way, anyway. Besides, if it worked for the pioneers, than it will work for me, too :) :) :)
ALSO ADD 1/4 (ONE QUARTER) TEASPOON OF SALT.
Sea salt is what I had on hand. I don't even remember why I bought this particular brand. It was probably the best value when I was at the grocery store. Sea salt is "saltier" then regular salt? That's how it is, right? In any case, I personally love sea salt :) :)
Okay, so now that you have those first three inredients, mix them together in a medium-size bowl. I didn't post a photo of that because it didn't look very interesting. Once you've mixed those three ingredients in a bowl, grab another bowl and add these two items together:
IN ANOTHER SMALL BOWL, MIX TOGETHER 1 CUP OF MILK AND TWO LARGE EGGS.
Now in the original recipe it called for fat-free milk. NOPE!!! I like whole milk. Or as we now call it in my home "chubby milk". Again, I think it's a matter of preference. However, I do think everything tastes better with chubby milk :) :)
Also, the eggs should be "lightly beaten". I'm not exactly sure what that means. It just means don't mix those eggs, like you're in a race to the finish line.
GRADUALLY STIR IN THE EGG & MILK INTO THE FLOUR MIXTURE UNTIL YOU ACHIEVE "BATTER" :) :) IT SHOULD LOOK SOMETHING LIKE THIS.
I didn't think to use a different color bowl. So it's hard to see what the batter really looks like. Those darker bits are the nutmeg. The batter should be a bit runny. It will make great crepes.
The recipe said to let the batter sit for 15 minutes. Although, you could let it sit longer. I had a recipe given to me by a real Frenchman years ago. In that recipe, it said to let the mix sit for 2 hours. That's really up to you. Oh, I can't find that recipe, so that's another reason why I tried this one today.
I didn't have a non-stick skillet. Since I'm using what I have on a hand, my yardsale steel frying pan would have to work. So that's what I used. I turned the heat to a hair below medium, to give the pan a chance to warm up without overheating or burning what I was about to cook :)
I USED JUST ENOUGH COCONUT OIL TO COAT THE SURFACE OF THE PAN.
Coconut oil is great to cook with. In addition to smelling really good in the jar, it burns very CLEAN in the pan. It doesn't brown, so it's perfect for cooking on medium heat. There are a lot of benefits to using coconut oil. So I've read, anyway. I'll try and post a really nice article I found about that later this week. Coconut oil is expensive. However, you only need a minimal amount. So that's what I went with. Besides that, butter is spendy and I have to save that for other recipes :) :) I didn't use a spray because I didn't feel comfortable doing that near a hot stove.
So I added a little bit of coconut oil before adding about 1/4 cup of crepe batter. I repeated that process for every crepe. Also note, that when I did that, I removed the pan from the heat. There's no reason in particular for doing that. It's just what I felt should be done :)
Oh, how did the crepes turn out? Really yummy. The first crepe turned out really ugly and three -dimensional:
THE FIRST CREPE WAS NOT PRETTY. HOWEVER, THE TASTE WAS NOT AFFECTED ONE TINY BIT. IT STILL TASTED DELICIOUS.
This is one that I made using the coconut oil to grease the pan. Oh, next time I'm going to add oil to the recipe itself. I think that will be easier and use less oil. What do you think? Also, my crepes turned out browner than what I remember. However, I think that was due to the fact that I was using a steel skillet. What has been your experience using different cooking utensils?
After you add the coconut oil to the pan, add about 1/4 cup of crepe batter. Let it cook and set for about 1 and a half minutes. Flip it over and let it cook on the other side for about 25 seconds. This worked great. Although, even here, you can alter that according to your needs. You'll know, after a few, when it's set and ready to be turned over.
THESE WERE ALL OF MY CREPES, MINUS THE UGLY FIRST CREPE. THIS RECIPE MADE 7 CREPES FOR ME.
I did switch to butter for the last half of the crepes. It didn't make one bit of difference, other than a slightly saltier taste.
Those are my crepes. They turned out great. You can fill them with sweet or savory fillings. Today my dad and I ate them plain. They were so good. Next time, I'll make a bigger batch. It would be nice to have some for the freezer.
Here's the original recipe as it appeared in the Fred Meyer "Naturally Preferred" magazine for May 2011.
CREPES
(from Weight Watchers New Complete Cookbook - Wiley, 2011)
Ingredients
1/2 cup all-purpose flour
1/2 tsp ground nutmeg
1/4 tsp salt
1 cup fat-free milk
2 large eggs, lightly beaten
1. Whisk together flour, nu tmeg, and salt in a medium bowl. Beat together m ilk and eggs in a small bowl. Whisk m ilk misture into flour misture until smooth. Let stand 15 minutes.
2. Spray an 8-inch nonstick skillet with nonstick spray and set over medium heat until a drop of water sizzles in pan. re-stir batter: pour scant 1/4 cup of batter into skillet, tiltingh pan to coat bottom completely. Cook until top is set and underside is golden brown, about 1 1/2 minutes.
3. With spatula, loosen edge of crepe and turn over. Cook until second s ide is loightly browned, about 25 seconds. Slide crepe onto plate. Repeat with remaining batter, lightly spraying skillet before adding more batter, making a total of 8 crepes.
So there's that particular recipe. I'll definitely be making more crepes later this week, and trying a different recipe. They were so good...and I only wish I'd made more, because now I'm dependent on crepes :) :)
That's the news from Oregon today. Love and hugs, Heather :)
Subscribe to:
Posts (Atom)